
For this episode of Start Shooting Better, we tried out Ernest Langdon’s 9-Shot Close Speed Drill. When viewed out of context, this is the kind of drill that some internet spectators tend to get a bit… opinionated about. But if you understand its purpose and proper application, it can be an incredibly useful tool for tuning up your extreme close range shooting skills, which is something a lot of us tend to neglect. Check out the video below for the details, or keep on scrollin’ for the full transcript.
CHRIS: Hello, Internet! Chris Baker here from LuckyGunner.com with John Johston from Citizen’s Defense Research. Today we are looking at the 9-Shot Close Speed Drill. This originated with Ernest Langdon and it’s something we’ve both shot in his classes. John, why don’t you give us the rundown on that.
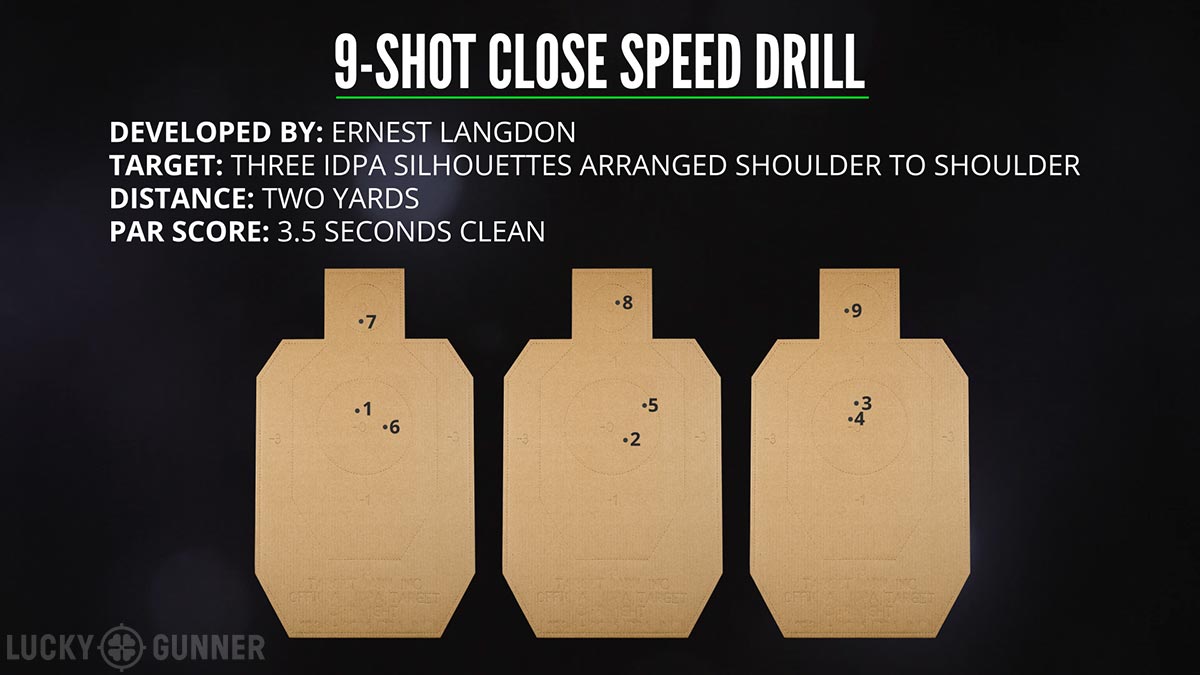
JOHN: Sure, he came up with this to work on the skills that he needed to dominate IDPA, which — he’s an incredible competitor. It forces you to go very quickly while still maintaining a high level of precision. So, course of fire: we’re going to start at two yards with three IDPA targets that are shoulder to shoulder. We’re going to draw, fire [left to right] 1 shot on the first target, one on the second target, two to the third target. Those all go to the bodies. Another one on the second target to the body, another one on the first target to the body, and then across the top, one to [each head, left to right] for a total of 9 rounds. And the goal is to do it in 3.5 seconds or less, clean.
CHRIS: So it’s draw, [three body shots left to right, three body shots right to left, three head shots left to right].
JOHN: Yes.
CHRIS: And it’s really easy to screw that up.
JOHN: Oh, it’s very easy to screw that up.
CHRIS: Just getting the course of fire right can be a challenge when you’re going at the speed you can go when you’re that close. And a lot of people look at this drill and watch people doing it and the first thing they think is, “well, this is ridiculous, that’s way too easy. You’re way too close to the target,” because you’re at, what, two yards?
JOHN: Yeah, two yards. There’s a couple of problems with people on the internet when they start talking about this. One, it’s a drill, not a scenario. Two very different things. The second thing is that by doing it at close distance like that, it’s actually forcing wider transitions than if you backed up. So you have to swing more on a close target than you would at a further target and that’s very important for what we’re working on here.
CHRIS: Right, at it looks like you can’t miss when you’re just beyond contact distance, but you absolutely can miss.
JOHN: Yeah, as we found out when we shot it, you can, in fact, absolutely miss. We ran it a couple of times and then we — after we ran the “official” ones because, you know, first take, no reshoots — but we did play with it a couple more times just to see how fast we could go and there were all sorts of misses.
CHRIS: And it’s also weird because you don’t really need a good sight picture, but you do have to have some way to index on the target.
JOHN: You need a good enough sight picture, and that’s one of the things that this is helping you work on, which I think is incredibly important, oftentimes overlooked. We spend a lot of time over-confirming sight pictures at distances we don’t need to. There’s plenty of other times when we don’t get a good enough sight picture. So this is a really great drill for working on that.
CHRIS: Right, so the first time I did it — we did two runs yesterday — the first run, I made a mistake that I make a lot of times because I don’t really practice at this distance often enough. I just kind of stuck the gun out there and started going and thought, “Well, you know, I’m close enough that just normal index will get me there.” And I had all kinds of misses, especially on the headshots. I did it a second time and I decided to get a rudimentary — not even a sight picture, I just wanted to see the front sight, and I got all hits that time and it wasn’t any slower. Some people are going to struggle with it the other way — they’re going to struggle with over-confirming the sights, so you don’t want to make the error in either direction.
Now, you’re shooting with a red dot which requires a little bit of a different technique. Can you explain what you had to do?
JOHN: Well, there are a couple of different ways you can do it. What I ended up doing and what I had the most success with is using the top of the RMR and sort of bisecting the target with that, sort of like a guillotine method, which is something I picked up in Scott Jedlinski’s red dot pistol class. This goes back to the “get a good enough sight picture for the distance and target.” For me, at that distance using the setup that I’m using, that worked really well. I’ve run this a lot with irons and I actually found it easier to do what I was doing because the top of the RMR is really hard to miss. It’s all going to depend on you, your skill level, your setup, and all sorts of stuff. But that’s why we run these: to figure this stuff out.
CHRIS: Alright, that’s the 9-Shot Close Speed Drill. I know a lot of you guys won’t be able to do this because of whatever range restrictions you have, but if you can, or if you have a chance to do it on a competition range somehwere or something, it’s a lot of fun and it gives you a lot of information about what you need to be able to do at close distance to still get your hits. So give it a shot and let us know how you like it.
JOHN: You know what the best way is to go and run this drill, right? Go take a class from Ernest Langdon.
CHRIS: That’s right! Good plug for Ernest Langdon.
Crap. I couldn’t make par on his 4 (2-reload-2) and 6 shot (body-head-body) 3.5 sec. drills, and you want me to try 9 shots? What, 2 yards? Hold my beer. . .