
Shooting small things far away with a pistol is hard. Today we’re going to talk about how to get better. And because ammo is in short supply, I’m gonna show you how to put in some meaningful practice at 25 yards using less than a full box of ammo.
By the way, this is Episode 15 of our Start Shooting Better series for those of you still keeping track.
Details in the video below, or keep scrolling to read the full transcript.
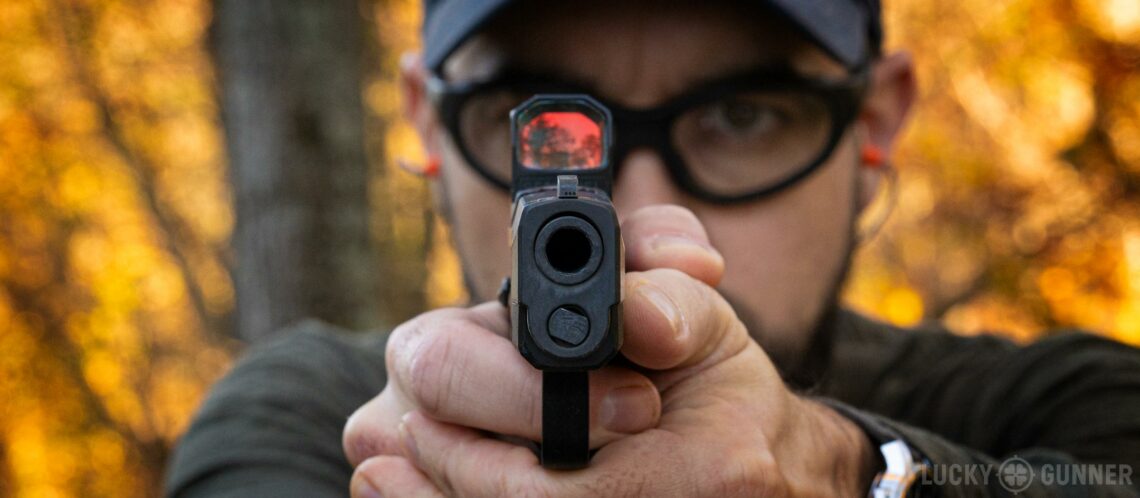
Hey everybody, Chris Baker here from LuckyGunner.com. For most pistol shooters, something seems to happen when the target is between about 15 and 25 yards where their confidence level just plummets. We tend to do most of our pistol shooting at closer distances. It’s easier that way. We can shoot faster, which is more fun. And for self-defense purposes, or even action pistol competition, those closer ranges are a lot more relevant anyway.
That said, a truly well-rounded pistol shooter doesn’t have any problem getting hits at 25 or 50 yards and beyond, even with some pretty tight time constraints. Today I want to give you some practical, tangible steps you can take to improve your long range pistol shooting.
First, let’s define our goal. What does proficiency at 25 yards look like? I think a good yardstick is the Kyle Defoor Pistol Hat Qual. This is a test that Kyle runs in his pistol classes. If you pass it, you earn a hat.
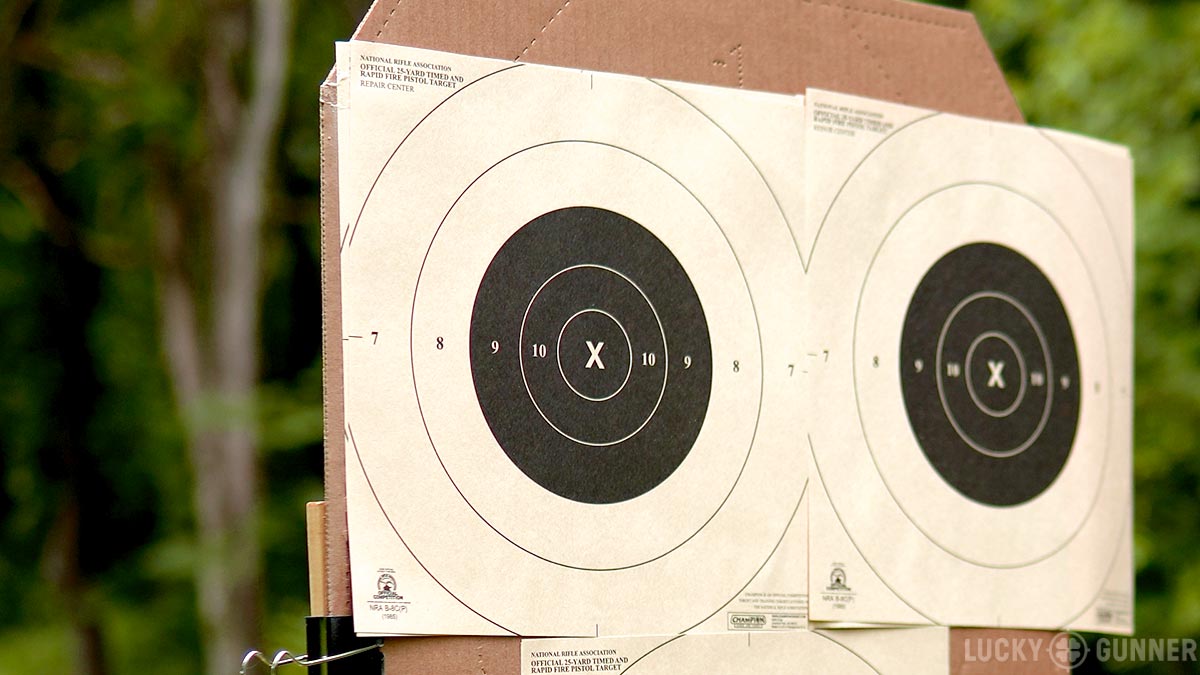
The target is a B-8 bullseye repair center placed at 25 yards. On the beep, you draw and fire ten rounds and you have a time limit of 20 seconds. Score the target as marked. Any hits off the paper are zero points. The maximum score is 100. Passing requires a score of 90 or higher.
This has become a fairly popular shooting test for evaluating proficiency at 25 yards. You may have even seen it before. There are a lot of videos out there of other people demoing the test. Of course, they always seem to pass it in those demos. But the brutally honest truth is that most shooters are not going to be able to just go to the range and nail this on their first try unless they’re regularly practicing out at longer distances.
I actually ran through the Defoor Hat Qual with John Johnston the last time he was in town and we were filming a batch of videos for this series. We each shot it three times because Kyle gives his students three opportunities to pass the test during his classes. John got really close a couple of times but didn’t quite get a passing score. I managed to eek out a 90 on my second attempt, but my first and third were pretty rough with an 80 and a 74. Overall, it was a pretty humbling experience.
Normally, I would show you the commentary that John and I did afterward. But honestly, neither of us had much to say at the time that was useful. The basic takeaway was that we should practice more at 25 yards because it’s hard. So I’m changing things up a little today. Instead of just showing you the test and saying “good luck,” let’s look at how to actually get better.
The hard way is to just shoot the test over and over and hope for the best. The better approach is to break it down into smaller pieces and drill those pieces individually. So I put together a little practice session based on the Defoor Hat Qual. Yesterday, I tried out that practice session at the range.
Now, I haven’t been doing much pistol shooting at all, lately. I’m way out of practice. I was a little worried this practice session was going to be an absolute disaster and I wouldn’t have anything to show you guys. It actually went really well. It ended up being a good way to knock the rust off and also focus on some skills that I don’t usually spend a lot of time on. So today, I’m going to walk you through that practice session.
Now, I know ammo is in short supply these days. You probably don’t want to burn through a few hundred rounds every time you go to the range. This practice session can be done with as few as 40 rounds, 50 at the most.
We’re going to do everything at 25 yards with B8 bullseye repair center targets. You can buy these, or download the PDF here to print some yourself.
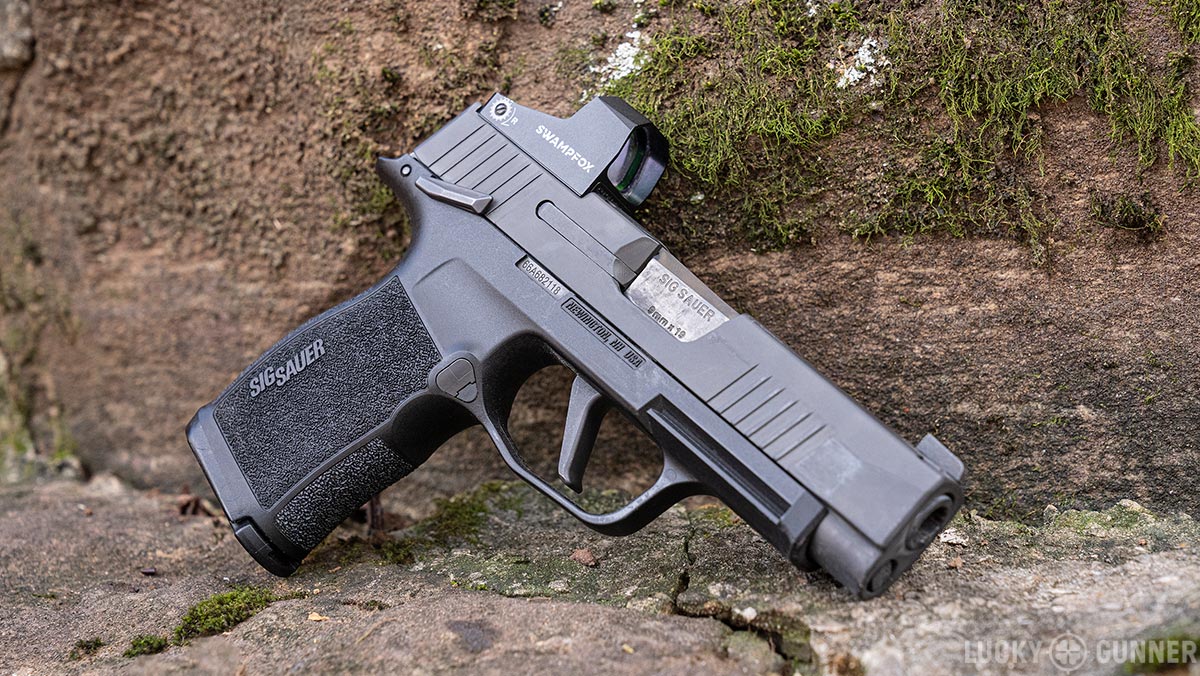
My demo gun today is a Sig P365 XL with a Swamp Fox Optics Sentinel red dot. I reviewed this gun a few months back and I’m still really happy with it. I’ve got some pistol optics reviews coming sometime down the road. So far, this Swamp Fox dot has been a great addition to this gun. Having a decent red dot has almost completely eliminated some of the most serious shortcomings of shooting a smaller gun like this.
You can absolutely do some good work at 25 yards and beyond with iron sights. But it’s hard to overstate just how much easier it is with a red dot. I’ll talk about that more in a just a minute. Let’s get to the practice session.
Check Your Zero
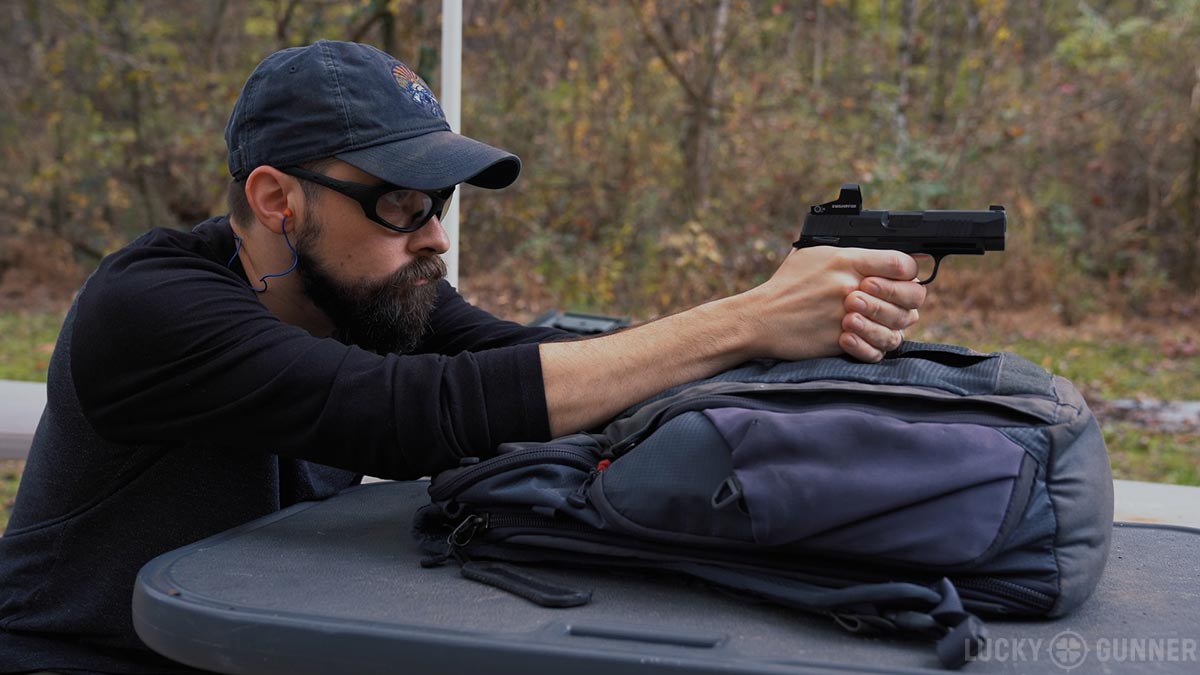
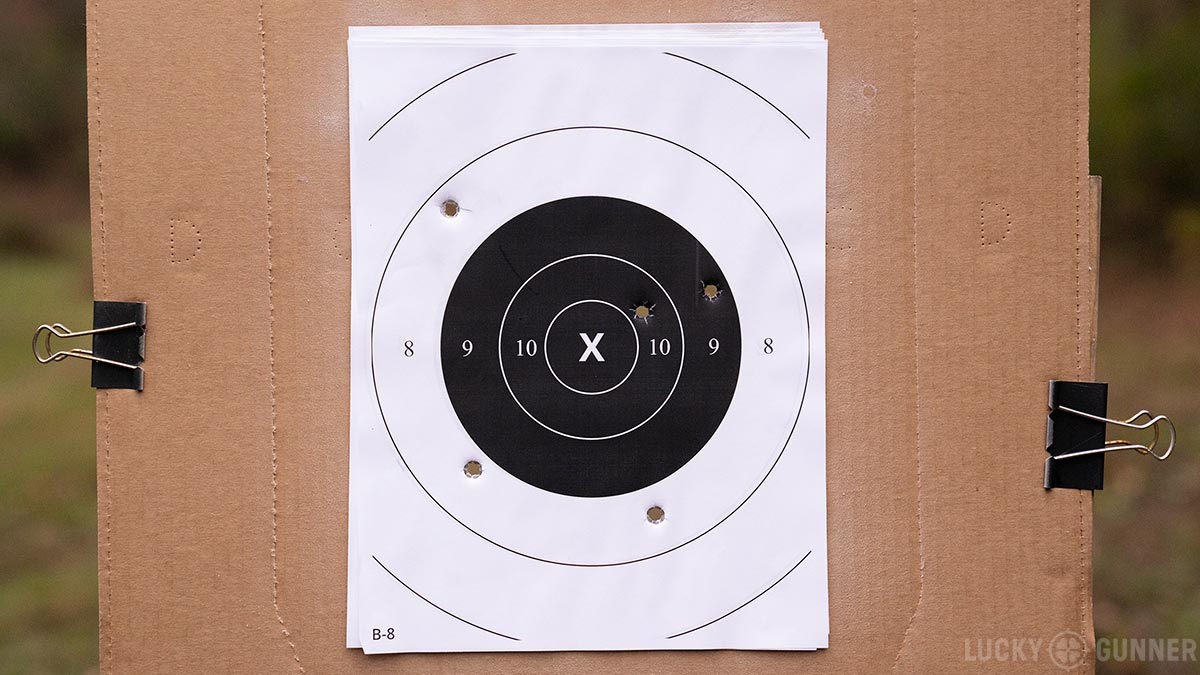
The first thing I would suggest is to fire five rounds with no time limit, preferably seated with a bench rest. It doesn’t have to be anything fancy. You can just use a table and your range bag if you want. These might end up being the five most important rounds of the whole practice session, so I’m going to park here for a minute.
What we’re looking for with these five shots is first, to confirm our zero and second, to make sure we can actually shoot a reasonably tight group. If you can’t get five rounds in the black shooting from the bench at a leisurely pace, trying to pass the Defoor hat qual is just going to be frustrating and you probably won’t learn anything. Instead, we would need to go into diagnostic mode and figure out what’s wrong.
The most common culprits are probably trigger control or maybe some kind of recoil anticipation. Either of those are going to mess up our sight alignment. Even small errors we make in sight alignment can have a magnified effect out at 25 yards. If you don’t press the trigger straight to the rear without disturbing the sights, you’re gonna miss at 25, even with a bag or a rest for support. Mastering the trigger press could probably be a book all on its own, so I’ll just leave it at that for now.
If you’re pretty sure your trigger control was solid for those first five shots but your group is off center, especially with rounds outside the black, the next thing I’d look at would be hardware issues related to your sights or your optic.
Very few handgun manufacturers actually zero their guns at the factory. Usually, the sights will be close enough so you can hit an 8-inch target at 10 or 15 yards with no problem. But now we’re at 25 yards and our target is this black 5.5-inch circle. Your zero can make a huge difference for something like that.
Obviously, with a red dot optic, it’s really easy to adjust your zero if you need to. With iron sights, you can usually drift the rear sight for windage if you have the right tools. Elevation is not as easy to change. You either need a file or a new front sight blade.
With modern semi-autos, the elevation is usually going to be pretty close right out of the box. However, the gun might not be set up for the type of sight picture you prefer. Again, this is something that you probably haven’t noticed when you’re shooting big targets up close. But at 25, it definitely matters.
For example, the sights on your gun might be set up for a six o’clock hold. So on a B8, you’d line up the top of the front sight with the bottom of the black circle in order to hit the bullseye. Or it might be set up so that you need to bisect the circle with the top of the front sight. Or it might be set up so that the dot on your front sight needs to cover the black because the bullet is going to go where the dot is.
If you don’t already know what your sights are going to do at 25, take these first five shots to figure it out. Just pick the sight picture that you prefer, and fire five good shots from a rest with a perfect trigger press.
Hopefully you’ll have a nice group on the target and that will tell you whether you need to change your sight picture, or make some hardware changes. You might also need to try a different type of ammo. Your point of impact can wander quite a bit depending on what load you’re using.
Now what if you are having problems with shot consistency? Maybe you’ve got a nice group, except for one flyer that’s way off on its own.
Or you’ve got a group that’s evenly distributed around the center of the target, but it’s just a really big group.
Again, the black circle here is about 5.5 inches wide. If we can’t shoot a 5-round group from the bench that’s smaller than 5.5 inches, passing that test is probably going to be out of the question.
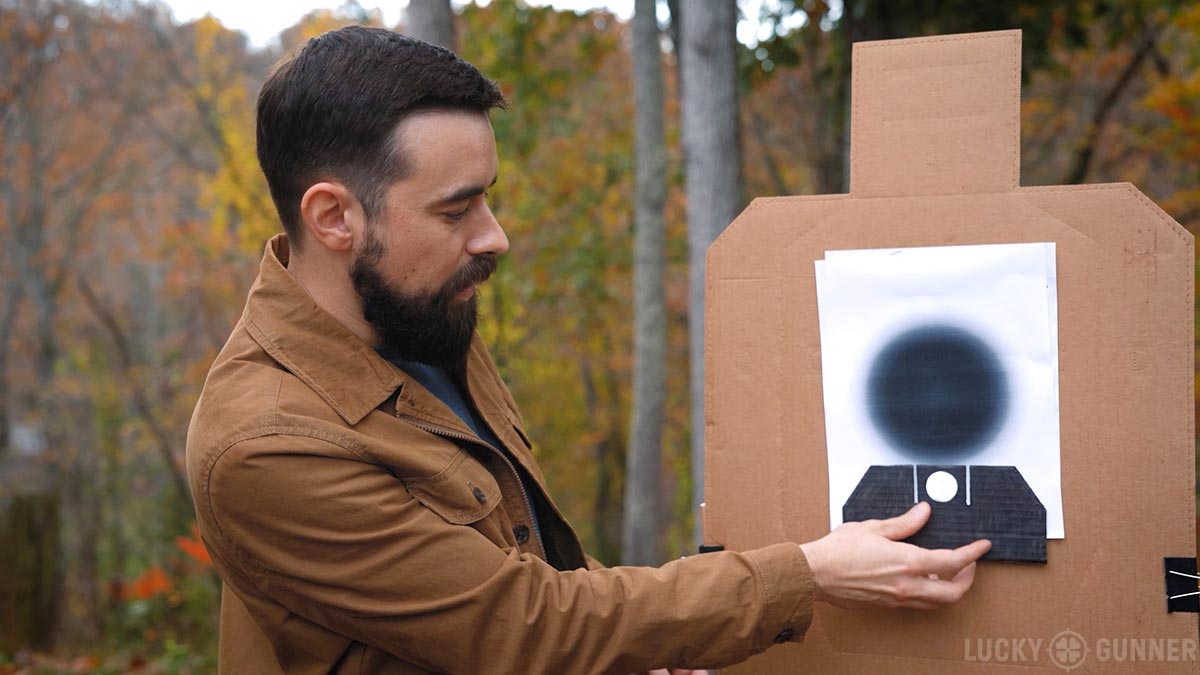
It could, once again, be a problem with trigger control or recoil anticipation. After that, the next potential cause I’d look at would be inconsistent sight picture. Are the sights in the same place relative to the target every time you fire? This gets a little tricky at 25 yards with iron sights. If you shoot with a sharp visual focus on the front sight the way most of us were taught, that black circle will be really blurry out at 25 yards. It might look more like this.
Personally, I prefer a sight picture where the front sight splits the bullseye in half. If I have to cover the target with the front sight, or go to a 6 o’clock hold, I can’t always tell if I’m putting those sights exactly in the same place every time. You might prefer a different sight picture and that’s fine, it just has to be consistent.
Sometimes, to work around the target being blurry, we might subconsciously shift our visual focus from the front sight to the target and then back to the front sight to make sure everything is lined up just right. Without realizing it, we might even do that as we are pressing the trigger. I think that can actually cause some flyers. It’s better to just commit — get a sight picture, lock in your visual focus on the front sight (or on the target if you’re a target-focus shooter) and press the trigger.
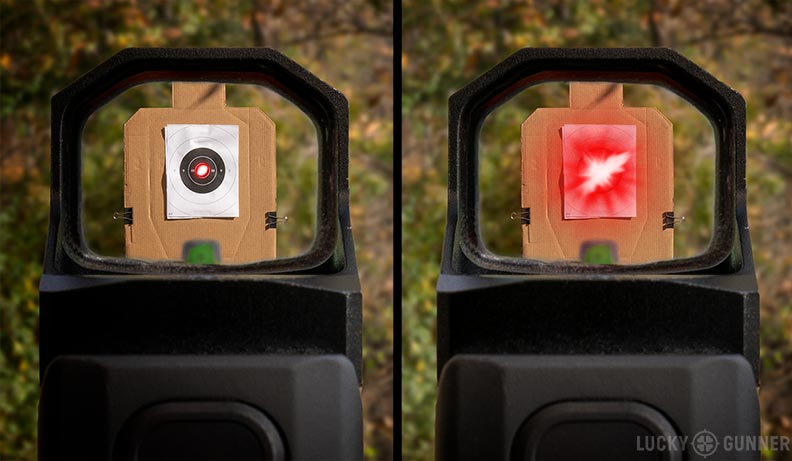
If your eyesight prevents you from getting a sharp focus on the front sight, you might be trying to precisely line up one blurry thing with another blurry thing. That’s going to be really difficult to do consistently. A red dot optic might be worth considering if that’s the case.
I’ll say it again — for everyone, vision issues or not, a red dot tends to make life a lot easier at these longer distances. It’s really no contest. Getting a good sight picture takes a fraction of the effort that it does with iron sights. Once you shoot with a dot at 25, it’s really hard to go back to irons.
Unfortunately, red dot optics are not immune to problems with visual focus. With a red dot, your focus should be on the target and you just superimpose the dot over that. If you get a lot of bloom when you see the dot (which can happen if you have astigmatism or simply because the dot is too bright) the dot might appear to be larger than the target. You can’t tell if you’re actually centered on the bullseye. That’s going to make your groups open up even if you’ve got perfect trigger control.
One last thing that might be a problem for consistency is, again, the ammo. Any time I review a pistol, I always shoot some groups from the bench at 25 yards with several different loads. Most of the time a gun has a couple of loads that it shoots really well with groups around 1-3 inches at 25. It’ll have several loads that it shoots okay with groups around 3 or 4 inches. And then it’ll have one or two loads that it hates and won’t shoot better than six inches — sometimes even 8 or 9 inches.
Usually, the best groups come from some of the premium hollow points, but sometimes the worst groups also come from premium hollow points. You can’t make any assumptions about the groups you’re going to get based solely on how much you paid for the ammo. More often than not, I can get groups around 3 to 4 inches or better with everyday full metal jacket range ammo. If a gun won’t group well with one load, nine times out of ten, the groups will get better with the next load you try.
Okay, so that’s your first five rounds. If you make any changes to your gun or to the way you’re shooting, do another five round group from the bench before you move on. If you don’t get a nice 5-round group in the black within a few tries, maybe this isn’t the day to practice at 25 yards. Most of us can’t afford to waste a whole lot of ammo right now, so know when to call it a day or switch over to some drills you can do at closer range.
Unsupported Slow Fire
If you’re in the black, we’re going to move on to the next step. We’re going to get up from the bench and alternate dry repetitions and live fire. No timer yet. Take as much time as you need, but no more than that. With our dry reps, we’re just getting used to holding that sight picture, then, a nice smooth trigger press without disturbing that sight picture as the shot breaks.
Take a break, rack the slide, and do it again. Repeat that until you’ve done 10 dry reps. Then load up the gun and fire five individual shots. Again, slow fire, no time limit. If you need to, bring the gun down to a low ready or compressed ready in between shots and take a little break. We basically want to confirm that what we’re doing in dry fire is going to get us on target.
After five rounds, go and check the target. For this whole practice session, don’t fire more than five rounds without taking a look at the target. I have 20/20 vision, and I can just barely see some of the 9mm holes in a target at 25 yards when the light is just right. Maybe you can see your hits from the firing line, but most of us will need to go down range and look at the target. If we’re not getting any feedback from the rounds we’re shooting, we’re not accomplishing anything. It does us absolutely no good to fire 20 or 30 rounds before we see what’s actually happening when we pull the trigger.
If you’ve got any rounds outside the 8-ring, hopefully you called those shots and you knew something was off when you pulled the trigger. If you’ve got multiple rounds off the paper completely, you should probably repeat this step. Keep doing the slow fire until you can figure out what you need to fix. If that means you don’t have enough ammo left to do this whole practice session, that’s totally fine. It’s still time well spent.
Working on Pace
Patch up the holes or put up a new B-8, then go back and do 10 more dry reps. This time, focus on not over-confirming the sights. If you were in the black on the last five, you know you can do a good trigger press at this point. So as soon as you see a decent sight picture, that’s your “go” signal. See what you need to see, then make the shot.
After those ten dry reps, do five more live rounds. This time, do them all as one continuous string. I would suggest using the timer, but you’re not holding yourself to any specific time limit at this point. Fire five rounds as quickly as you think you can stay in the black. Check your split times and that’ll give you an idea of how your pace compares to where you would need to be for the Defoor test.
That test is 10 rounds in 20 seconds, so to be on the safe side, you want to be a little under 2 seconds in between shots. Maybe around 1.7 or 1.8 at the most. But don’t let the timer push you around. If you’re not getting your hits, you have to figure out what needs to be fixed before you worry about the timer.
At the same time, going too slow can actually hurt your accuracy sometimes. You don’t want to over-confirm your sights or over think your trigger press. You don’t want to stand there so long that you get visually, physically, and mentally fatigued. Sometimes, if you just go for it, you’ll see your group size shrink right away.
Okay, after that five shot string, go check your target. Paste it up. Next, repeat five dry reps and a five-shot live fire string. If your first five shot string looked good and you feel like you’re on a roll and you want to just jump straight to five more live rounds, I think that’s probably okay. If you think you’d benefit from five more dry reps, do those first.
So at this point, we’ve fired 20 rounds total. We did five from the bench, five careful individual shots standing, and two 5-shot strings with the timer to tell us what pace we’re firing.
Add the Drawstroke
For the next ten live rounds, we’re going to work from the holster. But we’ll do it dry first. This will be just like the first dry reps we did, we’re just going to add the drawstroke.
When you do this, think: “draw quickly, shoot carefully.” We obviously have to take a little more care with our sight alignment and trigger press at 25 yards than we would at, say, seven yards. But there’s no reason for the draw stroke itself to be any slower. So go ahead and draw at full speed the way you normally would and just get the gun out there.
Now for me, when I haven’t practiced in a while, the first thing to suffer is my drawstroke. It gets much slower and I lose consistency. So I ended up doing a lot more than 10 dry reps on this. On any of these, you can always do extra dry reps. It doesn’t cost you anything. Just don’t do so many that you start to get tired or sloppy.
After your dry practice, try it with five live rounds. Take time to recover in between each shot and go at whatever pace you need to go to guarantee a hit. Check your target, then we’re going to repeat all that, but we’ll add the timer.
So for this next set of dry reps we’ll set up the timer with a second beep for our par time. When I did it yesterday, I set a par time of two seconds. I think that’s a pretty good goal to aim for at 25. In hindsight, that ended up being a little overly ambitious for me, considering how out of practice I am with my drawstroke. I felt pretty rushed at two seconds and I wasn’t getting the kind of clean sight picture that I knew I should actually have at 25. You have to be honest with yourself in dry practice — was the gun really on target when the trigger broke?
That first shot out of the holster is super important and it’s probably the one you’re most likely to miss. If you had 1.7 or 1.8 splits or better on those five round strings, you’re in pretty good shape for the test. At that pace, you can afford to take a little extra time on the first shot. Even if you’re at a 3 second draw, you will still come in well under 20 seconds on a 10-shot string.
Next, go ahead and fire five live rounds from the holster with the timer. You can leave the par time on, or turn it off. I decided to turn it off. I averaged about 2.5 seconds for this set of five, but I threw my last one almost out of the 8 ring.
Attempt the Hat Qual
That’s 30 rounds total so far. You might be at 35 or 40 rounds if you had to make some adjustments at the bench. For our last ten rounds, we’re going to put it all together and shoot the actual Defoor Hat Qual. That’s 10 rounds in 20 seconds from the holster.
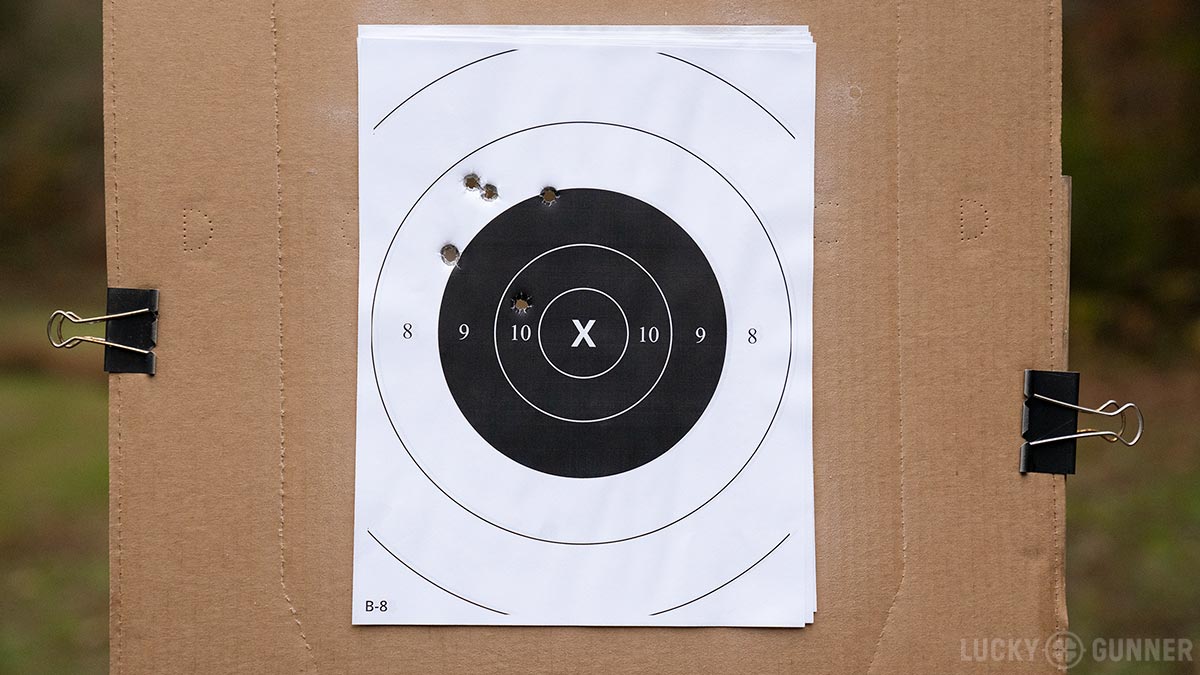
Here’s my attempt from yesterday. That low shot I fired on the drawstroke practice had me a little nervous, so I ended up really taking my time on the draw. Honestly, it was probably too much time — it was just over three seconds. But once I got going, I felt pretty good and ended up firing at a little faster pace than I had in the practice. I finished in 16.06 with a score of 95.
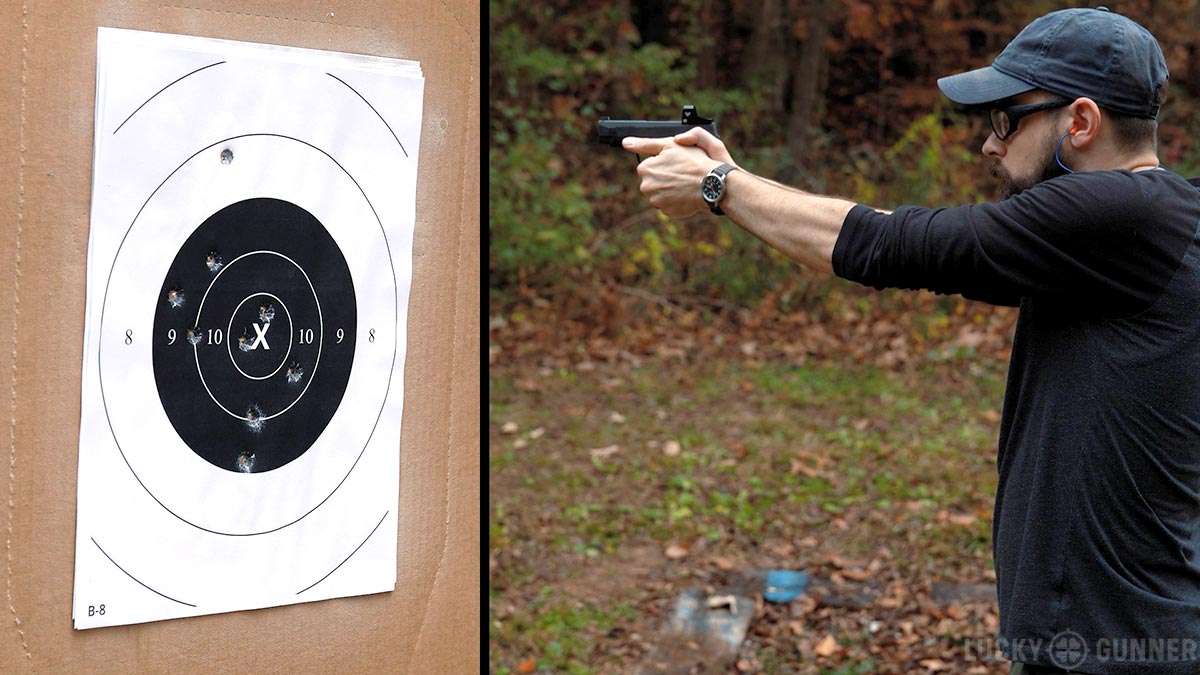
I’m pretty happy with that, especially considering how little trigger time I’ve had lately. That’s five points better than my best of three from the last time I attempted the Defoor Hat Qual.
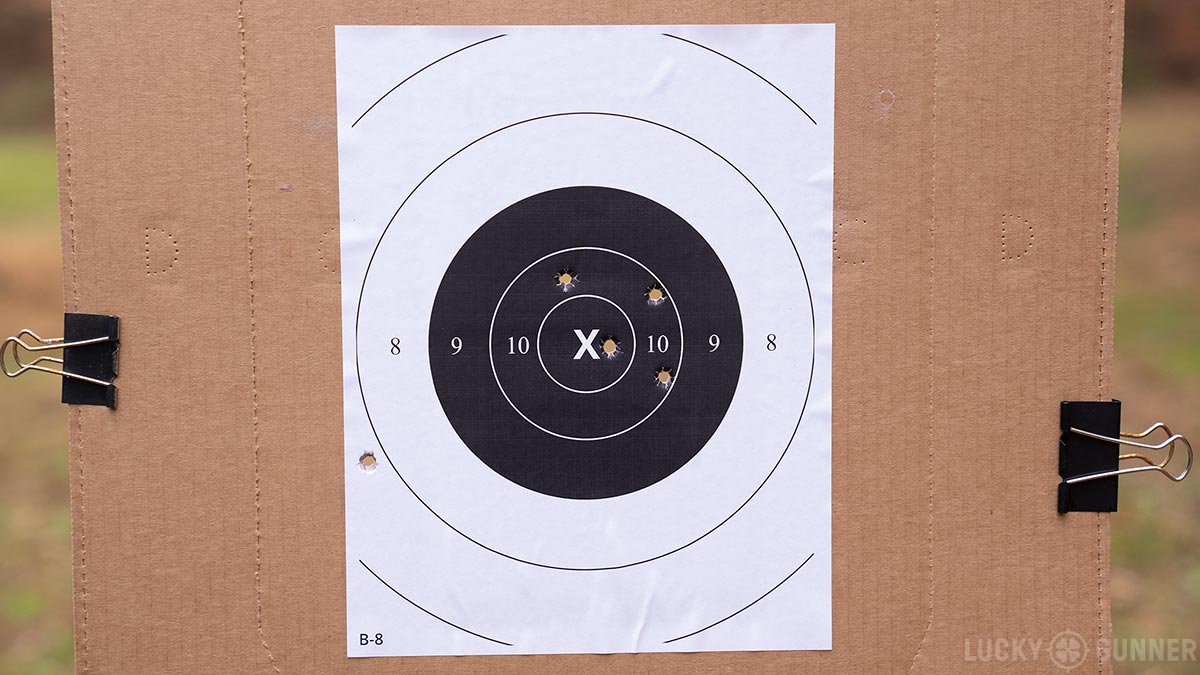
I still had ten rounds left in my box of ammo, so I decided to give it one more try and make sure that wasn’t a fluke. That time, I finished in 16.62 with a score of 94. That’s pretty good progress for a practice session that only used 50 rounds.
To summarize all that, here’s how your 25-yard one box of ammo practice session breaks down:
- Confirm zero and group size
- 5 rounds from the bench
- Slow Fire
- 10 dry reps standing at the 25 yard line with no time limit
- Fire 5 individual live rounds with no time limit
- Full Pace
- 10 dry reps at a faster pace – press the trigger as soon as you get a good sight picture
- With a shot timer, fire five live rounds in one continuous string. Take note of your split times.
- Repeat 10 fast dry reps.
- Fire another 5-shot string with the timer.
- Drawstroke
- 10 dry reps from the holster, no time limit
- Draw and fire a single live round 5 times, no time limit
- 10 dry reps from the holster with a par time
- Draw and fire a single live round 5 times with a timer
- Attempt the Defoor Hat Qual
- Draw and fire 10 rounds in 20 seconds
Alright guys, that’s it. I hope you found that useful. Give it a try and let me know how it goes.