
Note: If you came here looking for the handgun scoreboard, try this page.
This post has been a long time coming. The Lucky Gunner Lounge is only three years old, but I wrote my first gun reviews years before that. It was always my goal in these reviews to avoid some of the common pitfalls that frequently bothered me about other gun reviews I read and watched — specifically, the tendency to drone endlessly about technical details that don’t communicate anything to the average shooter about whether the gun is actually worth buying. Sure, there’s an audience for that sort of minutiae, but much of that information falls outside of the realm of what I would consider to be “useful consumer advice.”
But perhaps the more egregious sin of gun writers — and one I am more apt to fall into myself — is the habit of falling back on vague cliches to describe the experience of shooting a particular firearm. If you’re not going to bother to get out a shot timer and write down some numbers, don’t tell me that a gun is “capable of quick follow-up shots” or that it has “manageable recoil.” Without any kind of objective measurement, those statements are meaningless to the audience.
I have tried to avoid this kind of subjectivity in the gun reviews I do for Lucky Gunner, but it’s challenging. Without some fixed frame of reference, there are only so many ways to describe how well a gun shoots. In an effort to provide as much objective information as possible, my reviews usually include the results of bench rest group for accuracy testing, or I’ll weigh the gun’s trigger pull, or offer all of gun’s external dimensions, but that still doesn’t give you a very good idea of how well that gun performs as a tool of self-defense. In reality, no gun review can give you all the information you might need to know, but a good review should offer more than just vague assurances of what a gun is capable of.
With that in mind, today I’m unveiling the Lucky Gunner Handgun Test — a project I’ve been working on for the last few months to help make Lucky Gunner’s reviews better. The video below has a summary of the plan, or you can keep reading for a more detailed account.
The Lucky Gunner Handgun Test
Moving forward, any handgun I review will go through the official Lucky Gunner Handgun Test. Here’s how it’s going to work: Before I finish evaluating a gun, I will run it through a test that has been designed to evaluate the shooting skills most often required in real-world violent encounters. For each gun, I’ll shoot the test three times and I’ll take the best of the three scores and post it to a running scoreboard on this page so you can see how well I was able to perform with that gun compared to all the other guns I’ve reviewed.
Now, I realize this isn’t exactly scientific because this test is as much a demonstration of my shooting ability as it is an evaluation of the gun itself. So if a gun ends up at the bottom of the scoreboard, it doesn’t necessarily mean it’s a bad gun, it just means that it doesn’t happen to play to my strengths as a shooter. But the idea is to provide some point of reference. If I tell you that I can’t shoot gun A as accurately as gun B, you will be able to look at the test scores to see just how much of a difference we’re talking about.
I considered several well-established drills and shooting tests from the firearms training community to use in the Lucky Gunner Test and I ultimately settled on a modified version of the Rangemaster Core Handgun Skills Test. I have made small changes to a couple of the stages and I’m scoring it slightly differently, but it’s basically the same test that Tom Givens came up with to evaluate students in his defensive handgun classes.
Course of Fire
The test consists of nine stages and a total of 40 shots. All stages are timed and the final score is the total time with penalties for any missed shots. All rounds are fired into a single target, and I’m going to be using the IALEFI-QP target that is the standard for many law enforcement qualification courses.
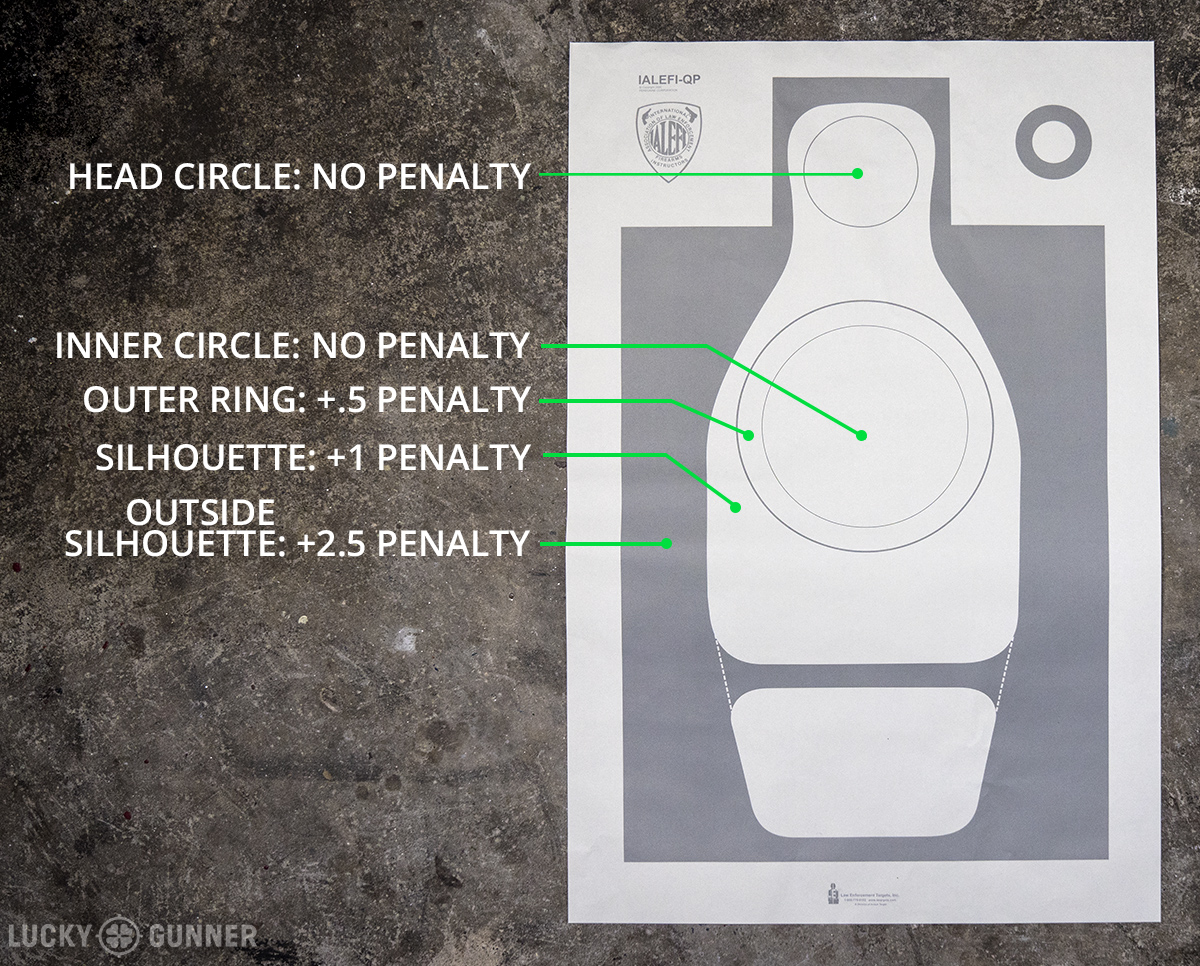
Hits in the 8-inch inner circle and the 4-inch head circle will receive no penalty. Hits in the 10-inch outer circle will add a half second to the final score. Hits in the rest of the silhouette will add a full second. Any hit outside of the silhouette, including hits to the lower pelvis area will add a two and a half seconds to the final score. All shots will be fired at the center circle unless otherwise noted.
Here’s the course of fire:
- Stage 1: From three yards, sidestep to the left or right, draw, and fire four rounds.
- Stage 2: From five yards, sidestep to the left or right, draw, and fire three rounds to the body and two rounds to the head.
- Stage 3: From five yards, start at low ready with the gun in the dominant hand only. Fire four rounds.
- Stage 4: From five yards, start at low ready with the gun in the non-dominant hand only. Fire five rounds.
- Stage 5: From seven yards, draw and fire five rounds.
- Stage 6: From seven yards, start at the low ready with four rounds only in the gun. Fire four rounds, perform an emergency reload, and fire three more rounds.
- Stage 7: From ten yards, draw and fire three rounds.
- Stage 8: From fifteen yards, draw and fire four rounds.
- Stage 9: From twenty-five yards, draw and fire three rounds.
So, for instance, my total time in the demo run I did for the video was 29.16 seconds. My target showed 9.5 seconds worth of penalties, so the final score was 38.66.
I chose this test because it’s got a little bit of everything and it’s well balanced. There’s an emphasis on getting quick hits at close range at the kind of distances where most gunfights occur. We’re also evaluating relatively long range marksmanship, an emergency reload, and some one-handed shooting, all of which represent skills that don’t come up as often in real life, but they’re all things you want to be able to do with your handgun.
The original Rangemaster test is slightly different. I only made changes to the course of fire itself on stages five and six. The original stage five is a typical Bill Drill: draw and fire six rounds at seven yards. However, this makes the test impossible for properly evaluating five-shot snub nose revolvers, so I decreased the shots required to five for that stage. To keep the test at an even 40 rounds, I moved that extra shot to the following stage. The original stage six calls for three shots, reload, three shots, so I simply changed it to four, reload, three.
Adjusting the scoring was a bit trickier. For the Rangemaster Core Handgun Skills Test, Tom uses the Comstock scoring system that can be found in USPSA action pistol competition. The targets are scored based on points rather than time added. Hits in the center are worth 5 points, the outer ring is 4 points, the silhouette is 3 points, and outside the silhouette is 0 points. There are 200 points possible. To get the final score, divide the target points by the total time, and then multiply that number by 20. This is a great way to evaluate shooters, but it’s a bit difficult to asses, at a glance, how different scores relate to one another. In order to make the test easier for readers to decipher, I decided to go with the more straightforward “time+penalties” method similar to the Vickers Count system used in IDPA competition.
Early Results
I didn’t want you guys to have to wait until my next review to get some numbers up on our scoreboard, so I went ahead and ran through the test with a few different handguns that I had easy access to. Most of these are guns I’ve reviewed in the past and right now it’s a bit heavy on double action semi-autos because that’s what I’ve been working with the most over the last year. I’ll be testing a few additional handguns in the coming weeks to diversify the list a little bit. If you take a quick glace at the scoreboard as it stands today, you’ll see that the scores in the top half are pretty close. The full-size and mid-size guns are all within just a couple of points of each other, including the K-frame revolver. The one exception is the 1911 I tested, but I’m going to attribute my mediocre performance with that pistol to the fact that I haven’t fired more than a magazine or two through a 1911 in at least a three years. Below the 1911, there’s a noticeable drop-off in scores with the smaller guns. These are more difficult to shoot well, and now you can see just how much of an impact that has on my performance.
I realize this is an imperfect way to evaluate a firearm, but I think it will provide a helpful dimension to our gun reviews in the future. I’ve tried to make the test as fair as possible, and I’ve outlined the details of the test protocol below.
Test Protocol
Like I said earlier, the human factor (me) prevents this test from being truly scientific, but I have set up some rules or “test protocol” to follow in order to help ensure that each handgun is being tested the same way under conditions as close to identical as I can make them. Because this test is intended to assess a gun’s performance in a self-defense context, I have also tried to make sure the test conditions reflect realistic conditions. I’m going to carry the gun the same way I would if I were actually carrying it in public. Sometimes these goals of consistency and realism are slightly at odds with one another, but I think I’ve found a suitable balance between the two. Here are the details of the test protocol:
Shooting Gear
Every test will be conducted from concealment with the gun in an appendix inside the waistband (AIWB) holster. I will always use a single layer cover garment for the test. For instance, if I’m wearing a t-shirt, a sweater, and a jacket, when I run the test, I’ll take off the jacket and make sure the t-shirt is tucked in behind the gun. Multiple layers increases the chances of fumbling the draw stroke, and since it’s not the guns fault that it’s chilly outside, I want to minimize the chance of that happening during a test.
For the reload stage, the spare magazine will be stowed on my belt at the 11:00 position. The Blue Force Gear 10-speed single pistol mag pouch fits just about any magazine out there, so I will use that, or something similar, for every test. For revolver reloads, I’ll use a speed loader stored in my right pocket. A belt-mounted speed loader pouch might be slightly quicker, but I’ve never carried one regularly, so I always practice revolver reloads from my pocket. I’ll use the most efficient speed loader available that fits the revolver being reviewed as long as its practical for concealed carry. This might seem a bit unfair since some speed loaders are slightly quicker to use than others, but lack of aftermarket support is a very real down side to carrying certain firearms, so I’m not going to make any concessions for a gun that’s too obscure to have good support equipment available.
Before I shoot a test, I’ll make sure the gun itself is sufficiently lubricated and at least reasonably clean. If I make any modifications to the gun, I’ll try to test the gun before and after the mods, and add both results to the scoreboard. The one exception is the sights. Before I even shoot a new gun, I always black out the rear sights and add bright paint to the front sight. I consider this a must for any defensive handgun, and it’s a cheap mod that anyone can do at home, so just assume I’ve done it to any test gun. If I actually replace the sights or make any other changes to the gun, I will indicate that on the scoreboard page.
Ammo choice shouldn’t be much of a factor except for two cases – the 25 yard stage, and magnum revolvers. There is little to no discernible difference in my performance with +P defensive ammo versus standard pressure range ammo for most semi-autos, so I’ll plan on using whatever FMJ ammo I have on hand. Even if a particular gun doesn’t group exceptionally well with the range ammo, that shouldn’t really come into play on the shooting test until the 25 yard stage. If I have any doubts about the ammo at that distance, I’ll switch to a load that the gun performed well with during the bench rest tests.
For magnum revolvers, my performance could change pretty dramatically depending on whether I use standard or magnum ammo. I will attempt to run the test both ways and post two different scores, but I’m not making any promises that I’ll do this every time. For example, I have no desire to run a 12-ounce .357 magnum snubby through a 40 round test with magnum ammo, and my willingness to “take one for the team” only goes so far. I’ll be sure to indicate on the scoreboard which ammo was used for the test.
Environmental and Physical Conditions
The private range I use is outside, so I have to contend with the weather. Poor lighting, extreme temperatures, rain, snow, wind, or other inclement weather conditions can easily have an adverse affect on my shooting performance. That’s good for practice, but not so good for preserving consistency in the handgun test. To minimize environmental effects, I will only test a gun in dry weather with moderate temperatures and sufficient ambient light.
I won’t run an official test if I’m sick, injured, fatigued, or otherwise having an “off day” that would affect my shooting.
Before I run the test, I’ll make sure I’m “warmed up” with the test gun. Ideally, I will have been shooting the gun frequently while evaluating it for a review, so I should be plenty familiar with it ahead of time. If I shoot a few drills to get warmed up and the gun and I aren’t getting along for whatever reason, I’ll come back to the test later.
In summary, if I have any reason to believe I will be uncomfortable, distracted, or otherwise unable to shoot to my best potential, I’ll put off running an official test until another time. I don’t want to have excuses built into the test results like “but the sun was in my eyes” or “I had the sniffles that day.”
Skill Level
The one factor that is really difficult to control for is my actual skill level. What if I don’t make it out to the range for several weeks and my shooting performance suffers? What if I pick up some helpful tips at a shooting class and get a little quicker with my draw stroke? The answer is… I don’t know yet. That’s something I’ll have to decide when it happens. There are always guns in my safe that I know will allow me to perform to the best of my potential, and I’ll be sure to run the test with those guns periodically. If I start to notice an appreciable change in my score, I’ll consider hitting the reset button on the scoreboard.
I’m sure there’s something I missed here, so let me know if you’ve got any questions or suggestions for improving The Test!