
Welcome back to Part 2 of How to Use a Semi-Automatic Pistol and the third video in our Shooting 101 series. If you didn’t catch the first half of this tutorial on semi-autos, you can find that here. In part 1, we talked about the rules for safe gun handling and how to load and unload the pistol. Now we are moving on to look at how to fire a semi-automatic.
The semi-auto tutorial continues in the video below, or you can scroll down for the transcript with a few modifications to help it make sense without the visual demonstration.
How to Fire a Semi-Auto
Like I said last time, there are tons of different types of semi-auto pistols and I can’t cover all the details that are unique to operating each different model so be sure to look over the owner’s manual for your specific gun.
When we left off last time, we had just finished loading the pistol. We’ve got the magazine in and there’s a round in the chamber and we are ready to shoot it. This is the point where we will engage the safety or decocker if our gun has one, but we’ll talk about those more in a second.
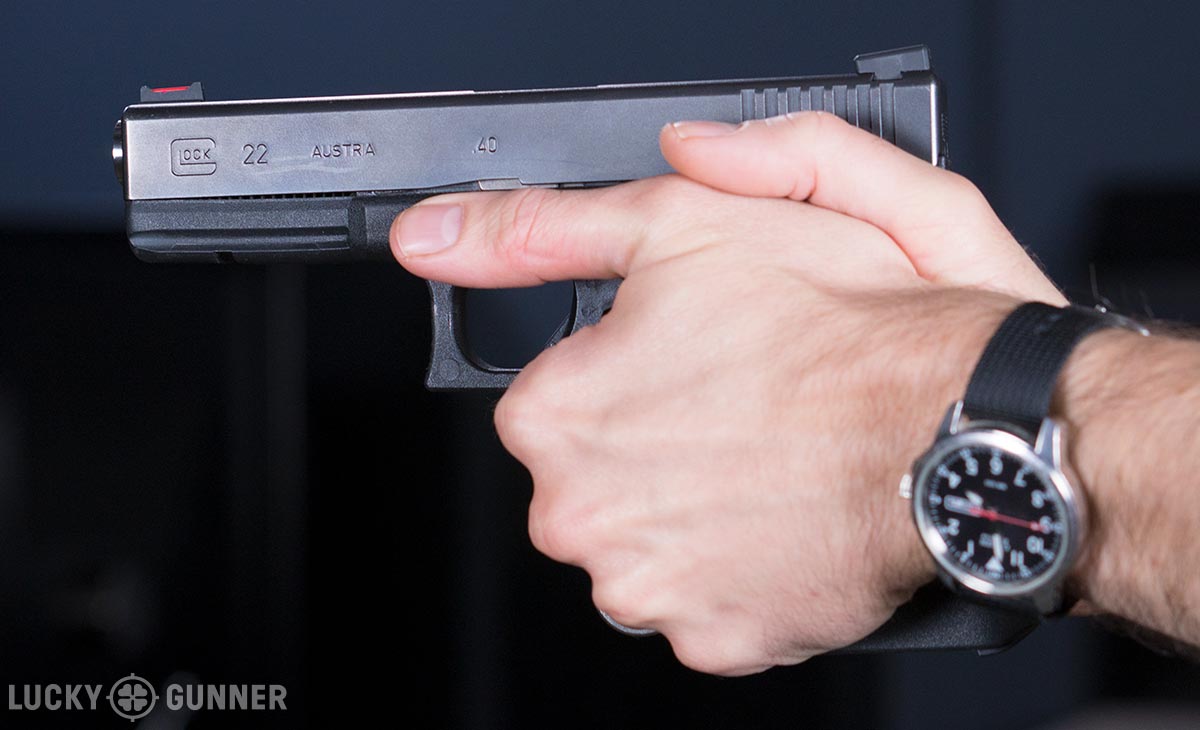
Regardless of what kind of gun you have, you’re going to grip it more or less the same way. Place the web of your dominant hand as high up on the back of the grip as you can get it. Keep your index finger straight and up on the frame or on the slide, well away from the trigger. Wrap your other fingers around as high up on the front of the grip as you can get them. Your thumb can rest on top of the manual safety if your gun has one, but otherwise, you want to make sure to keep your thumb clear of any of the other controls, particularly the slide stop.


Now bring in your non-dominant hand. Blade your hand and rotate your wrist down so that your thumb is pointing forward. Place your hand on the grip so that as much of the meaty part of your palm as possible contacts the open space on the grip. Wrap your fingers around the front so they’re on top of your other fingers. The top of your non-dominant index finger should be touching the bottom of the trigger guard. Point your thumbs forward, but don’t rest them on the slide because it needs to move freely.
You might have to grip the gun a little differently depending on the size of your hands and the size of the gun. But whatever you do, don’t wrap your non-dominant thumb behind the grip because the slide will cut you when the gun fires and that’s not any fun at all.
Once you’ve established a grip, hold out your arms straight in front of you but don’t lock your elbows. Point the gun down at the ground just in front of the target. This is the low ready position. When you’ve decided to shoot, bring the gun up to eye level and squeeze the grip really hard with both hands. Now you can move your finger to the trigger. Press the trigger to the rear with steady, even pressure without moving the rest of the gun. And… bang. Congratulations, you’ve just put a hole in something!
In the split second after the gun fires, the slide will automatically move to the rear, a spent shell casing will fly out and the slide will return to the forward position. This will all happen in the blink of an eye. Then you can fire another shot. And you can keep firing until you decide to stop or the gun runs out of ammo. In either case, when you stop shooting, place your index finger back on the frame away from the trigger and lower the gun to the low ready position.
When the last round in the magazine has been fired, the slide will lock open. If it does not lock open, it’s usually because you have been inadvertently holding your firing-hand thumb on top of the slide stop. If that’s the case you will only know the gun is empty when you press the trigger and you hear a “click” instead of a “bang”. You will then have to manually rack the slide to lock it open. Whether the slide locks open or you have to open it manually, the next step is to remove the empty magazine. Put the gun down with the slide open and the barrel pointed in a safe direction. Now you’re ready to load up the magazine and shoot some more.
That procedure will work fine if you have a striker-fired or double action only pistol with no manual safety. But let’s go back and look at some of the additional steps you need to take if your gun does have a manual safety or a decocking lever.
How to Use A Manual Safety
Manual safeties are most often located on the rear-left side of the frame close to where the firing hand thumb rests, and sometimes a matching lever appears on the right side of the pistol as well. This is the type of manual safety found on the single-action Model 1911 and pistols patterned after it such as the Sig P238 and P938. Other pistols with similar style manual safeties (typically called a “frame mounted safety”) include the CZ 75, Browning Hi Power and the Smith & Wesson M&P series (although the safety is an optional feature on the M&P and most of these pistols do not have one). With all of these models, the up position places the gun in “safe” mode and the down position is “fire.” Be aware, however, that the frame-mounted safety may work in the opposite direction on some pistols (the Ruger SR-22 comes to mind as one such example). Other exceptions include slide-mounted safeties, but we’ll look at those when we get to the part about decockers.

When the safety is in the safe position, the trigger should be blocked and the gun is not supposed to fire, but safeties can fail. We never rely on the safety, and we still have to follow all of the rules of safe gun handling.
The reason many of these guns are equipped with manual safeties is that the trigger has a very short length of travel which tends to be unforgiving of mistakes. If you get your finger on the trigger when it’s not supposed to be, or you get something caught in the trigger guard like a chapstick or a drawstring from your jacket, it doesn’t take much to discharge the gun unintentionally. So only disengage the safety when the gun is pointed at the target and you’re ready to shoot. Unfortunately, with some pistols (like the Model 1911), the slide will not open when the safety is on, so it must be disengaged in order to clear the gun and load it. But as soon as the slide closes, flip that safety back on and leave it on until you’re ready to shoot or unload.
How to Use a Decocker
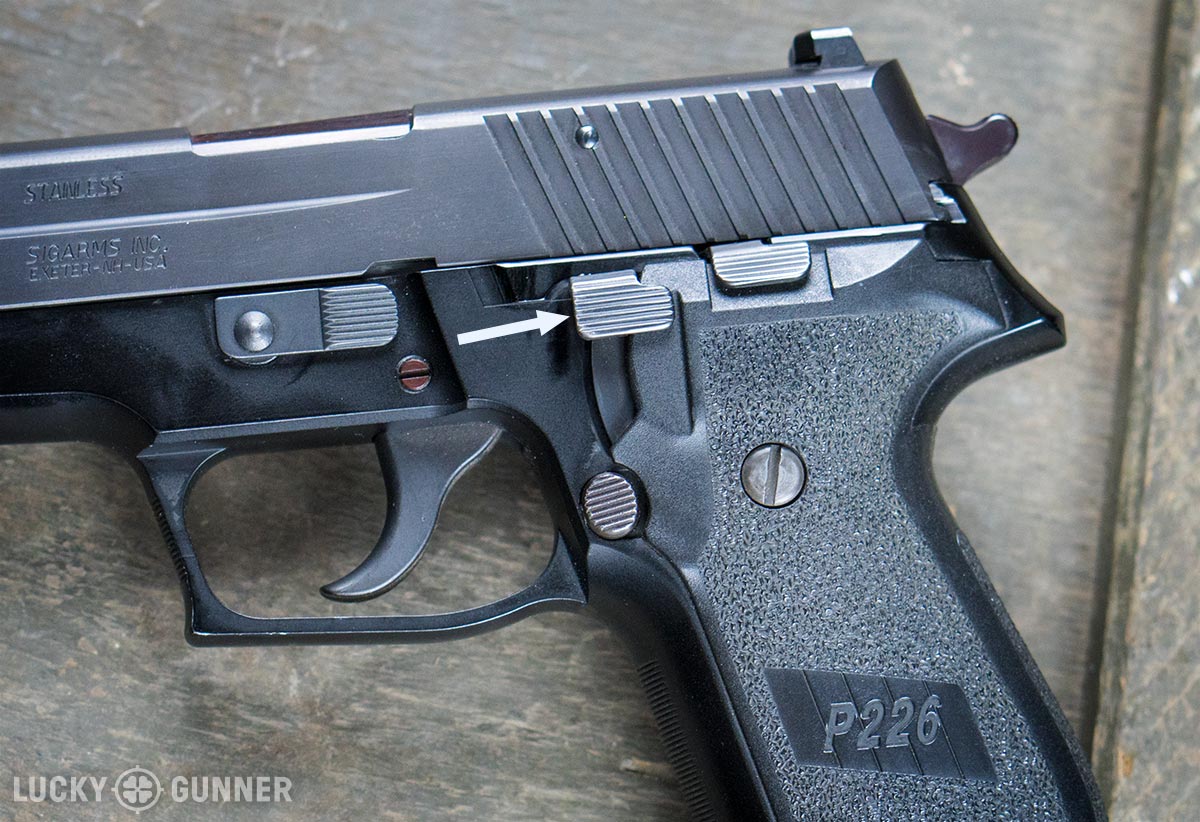
If your gun has a decocking lever, it could be located in any number of places, but you will often find it on the frame above the magazine release (as in the Sig Sauer P226 photo below), or on the side of the rear portion of the slide. Decockers are exclusively found on double action/single action (DA/SA) pistols. When the slide is racked on a DA/SA gun, it cocks the hammer. That makes the trigger travel really short which, as we discussed above, is a liability and we want to avoid leaving the gun in this condition until just before we’re about to fire. Instead of engaging a manual safety, the decocking lever is used to lower the hammer without firing the gun. With the hammer down, the gun is still ready to be fired, but the first shot requires a long and heavy trigger press which requires a much more deliberate action.
After the first shot is fired, the slide moves to the rear and cocks the hammer again. So for every subsequent shot after the first shot, the trigger’s movement is shorter and easier to manage (thus making the gun a bit easier to shoot accurately). Whenever you stop shooting and lower the gun back to the low ready position, decock the hammer. The longer trigger acts as a kind of safety on a DA/SA gun, and it should be decocked unless you are actively shooting at a target.
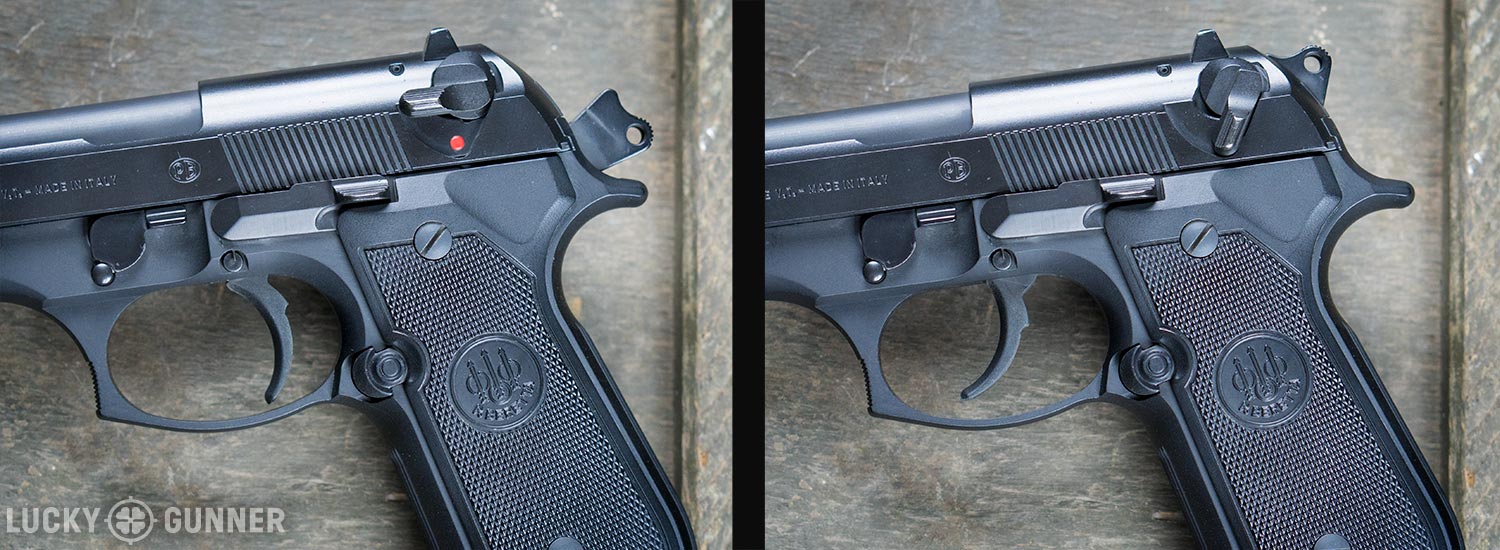
Some pistols have a decocker that also acts as a manual safety, like the Beretta 92FS pictured below. The safety/decocker is located on the slide. The hammer is decocked by pressing the lever down. Unlike the Sig, the lever then stays in the down position, which puts the pistol in safe mode. If the lever is already in the down position before the slide is racked, the hammer will decock automatically.
When you’re ready to fire, you have to disengage the safety (push the lever up) and then you still have to deal with the long double action trigger for the first shot. Notice that the slide-mounted safety works in the opposite direction of the typical frame-mounted safety in the section above (down is safe and up is fire).
This is the one type of pistol where I would consider using the safety to be optional. As long as you decock it, the longer trigger should provide enough of a hedge against an unintentional discharge. If you want to disengage the safety after you decock, that is typically considered an acceptable practice with DA/SA pistols that have a safety/decocker.
Summary
That was a lot to cover. If you’d like to review it all with a live fire demo, I’ve provided a short excerpt from the video above covering all of the procedures for using a semi-auto from both part 1 and 2. In the video, I happen to be using a double action/single action pistol with a decocker.
If you want to know more about how to use a semi-automatic pistol effectively, take a look through the “toolbox” section of the blog archives. And of course, when you’re ready to go shooting, be sure to get your ammo from Lucky Gunner and have it shipped right to your front door!
Great videos! I’ve been shooting now for a few months, but it is good to periodically review videos like this. I need to focus on properly positioning my support hand. I like how you suggest making sure the fingers on the support hand are up against the bottom of the trigger guard. If you are looking for some ideas on other videos, it would be great to have a video on proper “etiquette” in a gun store. How should you accept a gun from the attendant that you want to look over, what should you look for as you handle it, and what should you do (can I dry fire? where do I point it?) and what you should NOT do as you look it over. Nobody wants to look like an idiot to the attendant!
By the way, I’ve purchased ammo from you two times now, and both have been great experiences!
Gary Breton had a good suggestion. Also what to expect and the rules and etiquette of an indoor range and an outdoor range.