
Welcome to the first installment of our new Shooting 101 series! As I explained in an article last week, I’ve noticed a big need for concise, easily digested resources that cater to the absolute beginning shooter who needs to learn just a few basics before they get more in-depth instruction. A lot of us have gotten that call late at night from a friend or family member that goes along the lines of, “Hey, I just bought a gun. How do I load it!?” Or maybe you are that friend or family member right now. If so, this series is for you.
We’re starting things off with a basic introduction to double action revolvers (don’t worry too much about what “double action” means at this point. This article will cover 98% of the revolvers made in the last 100 years). A lot of this info is best communicated via show-and-tell, so I recommend watching the video below. But if you’d rather read, the full transcript is also provided, though a few points have been changed up a bit to make up for what’s lost in translation to the written word.
One of the great things about revolvers is that they are very simple to operate and handle safely, even with little to no training. On the flip side, they are very challenging to shoot well and that’s why most of our other videos and articles about revolvers deal with the finer details of marksmanship and gun handling. But for those of you who just got your first revolver (which might also be your first firearm, period) and you have no idea what you’re doing and don’t know where to start, this is for you.
This is not going to make you a great marksman and it’s not a replacement for professional in-person training, which I strongly encourage you to pursue, but I’m going to show you the basics of how to operate a double action revolver – how to load and unload it, how to fire it, and how to minimize the risk of having some kind of accident.
Rules for Safe Gun Handling
If you’re a new gun owner, we need to start by talking about safety. Handling firearms is an inherently dangerous activity. Every time you pick up a gun, you are making life and death decisions. Don’t ever let that be far from your mind. But we can mitigate a lot of that risk by following the four basic rules of safe gun handling. You might hear these worded in a number of different ways, but here’s my summary:
- Treat all guns the same way you would treat a loaded gun.
You cannot ignore the other three rules just because you believe a gun is unloaded. - Always keep the gun pointed in a safe direction.
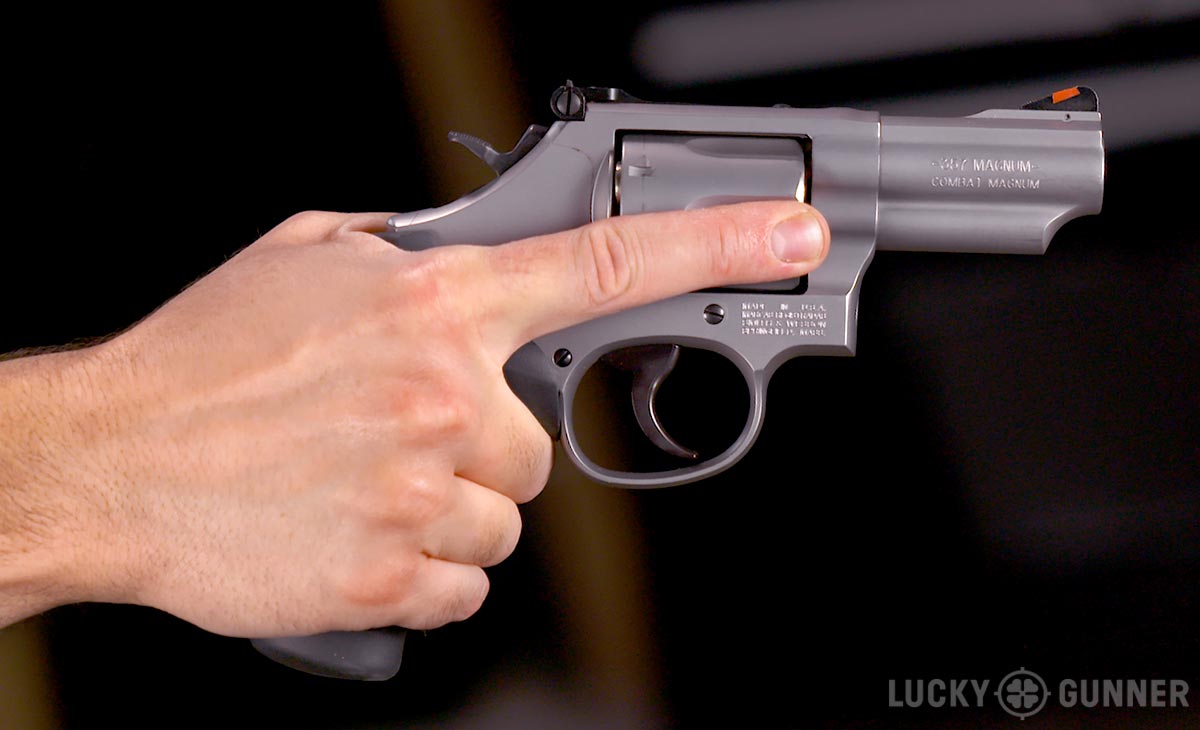
That means, if the gun were to fire, it’s not going to hurt anyone and it’s not going to damage anything you can’t afford to replace. Remember that bullets fired from revolvers can easily go through solid objects like interior sheetrock walls. Just because you don’t see anyone doesn’t make it a safe direction. - Keep your finger away from the trigger until you’re ready to shoot something.
Find a place on the frame of the gun above the trigger guard and park your finger there until it’s time to fire. - Know what it is you are shooting at and what is behind it.
This applies to targets at a shooting range, animals on a hunt, or even a violent attacker. Positively identify your target and assume your bullet will continue on to hit whatever is on the other side of it.
There’s a lot more to using a gun safely than just the four rules, but if you follow them, you greatly reduce your chance of unintentionally hurting yourself or someone else.
How to Load and Unload a Revolver
To load the revolver, first you need to open the cylinder; that’s the big round part in the middle of the gun. You can usually find the cylinder release latch right behind the cylinder. Depending on what model you have, you’re either going to slide this latch forward, slide it to the rear, or push it inward.
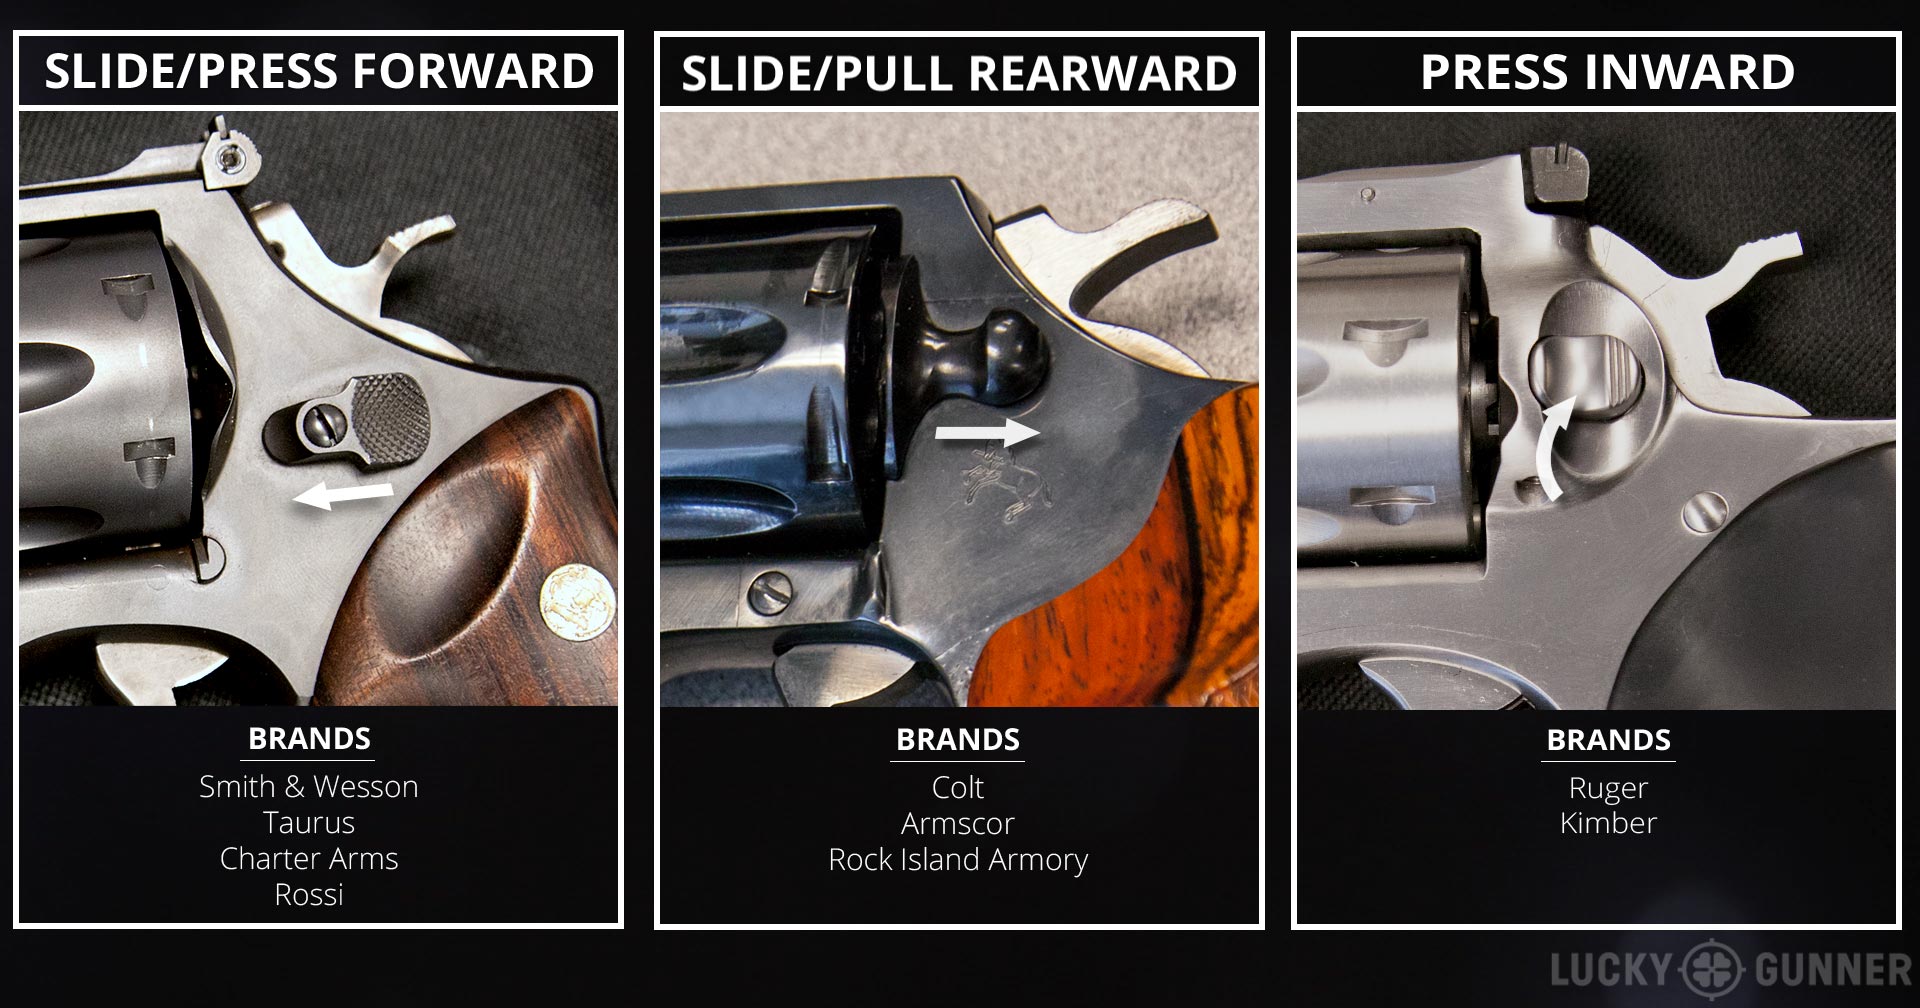
If you’re right handed, start by holding the grip with your right hand. With the right thumb, press and hold the cylinder release latch. Now reach under the gun with the left hand and push on the right side of the cylinder. It will swing outward from right to left. Once the cylinder starts to move, you can stop pressing the cylinder release latch. After opening the cylinder, “cradle” the gun in the left hand. This will free up your right hand to handle the ammunition (and you’re less likely to drop and fumble the small cartridges if you use your dominant hand).
The process is slightly different for left handed people. Start with your left hand on the grip. With the left index finger, press and hold the cylinder release latch. Then use the right thumb to push the cylinder and it will swing out from right to left. Transfer the gun to your right hand so it’s cradled in your palm, and now you can use your left hand to handle the ammo.
Once the cylinder is open, point the gun down toward the ground. Place a cartridge into each of the chambers or “holes” in the cylinder. Then push the cylinder closed until it clicks into place (Don’t fling the revolver to the side to force the cylinder closed like they do on TV. This will damage the gun). The gun is now loaded and ready to be fired.
If you want to unload the gun without firing it, open the cylinder again, transfer it to your non-dominant hand, and then turn the gun upside down and allow the ammo to fall into the palm of your dominant hand.
If any of that was a bit confusing, I’ve pulled out a one minute clip from the video above (with optional subtitles) to illustrate only the loading/unloading process:
How to Fire a Revolver
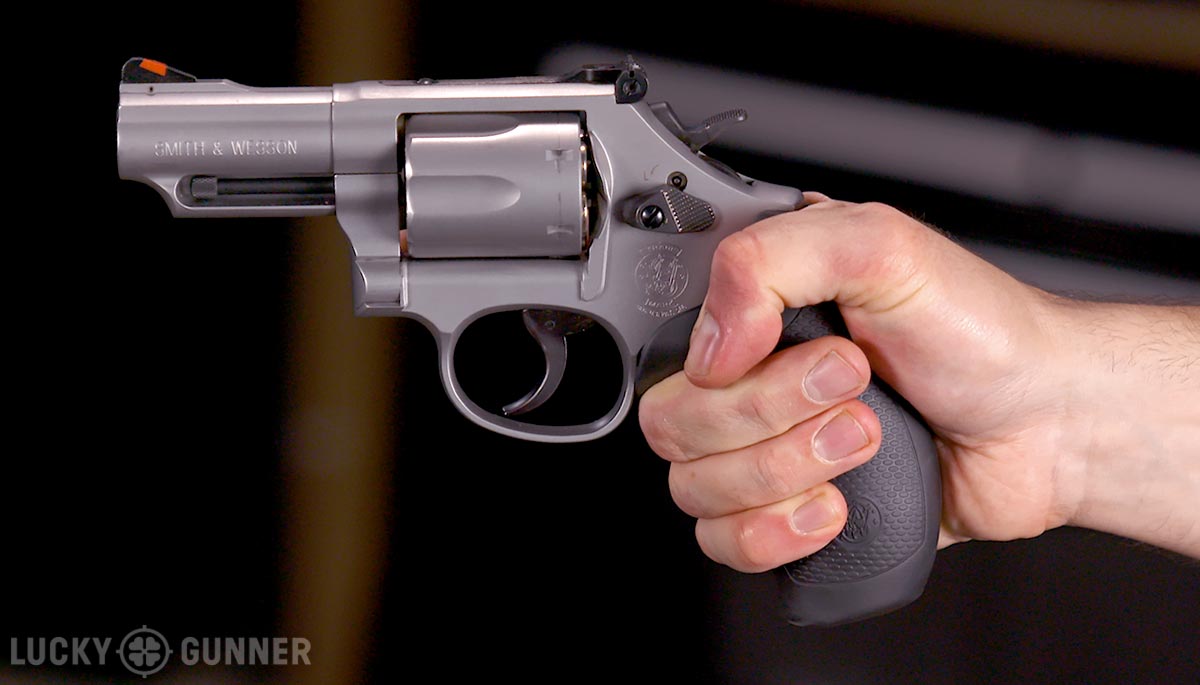
When you’re ready to fire the gun, grab it with the web of your dominant hand as high up on the back of the grip as possible. Keep your trigger finger (index finger) straight and rest it on the side of the cylinder, well away from the trigger. Wrap your other fingers around front of the grip. Tuck in your thumb like you’re making a fist. It should look something like this:
Now bring in your non-dominant hand. Wrap the fingers around the front of the fingers on your other hand. The top of your index finger should be touching the bottom of the trigger guard. Tuck in your non-dominant thumb and hold it on top of your other thumb. The final two-handed grip will look like this:
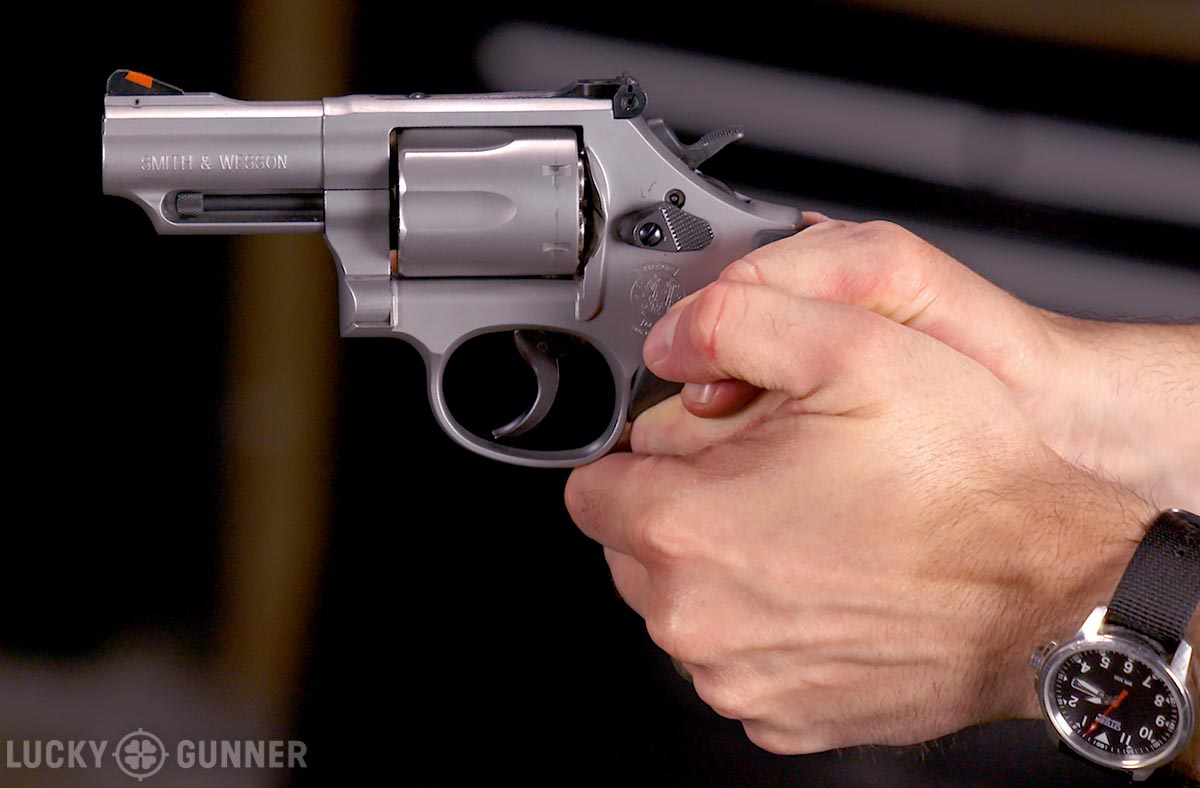
There are multiple ways to grip a revolver, and there is no one “correct” method. The technique that works for you will depend on your hand size and the size and shape of the gun’s grip. The technique above is usually a good start, though. Whatever grip you eventually adopt, just be sure to keep your fingers off the cylinder so that it can turn freely. Also don’t place any fingers in front of the cylinder, because they may get burned by the hot gasses that rapidly escape from that area when the gun is fired.
Once you’ve established a grip and you want to fire, squeeze the gun as hard as you can without making the barrel shake. Bring the gun up to eye level as you point it at the target. Now your index finger can move to the trigger. Press the trigger straight to the rear with steady even pressure without moving the gun. Congratulations, the gun has fired and you have now put a hole in something! Press the trigger again if you wish to fire another shot and you can keep doing that until all rounds have been fired and you get a “click” instead of a “bang.”
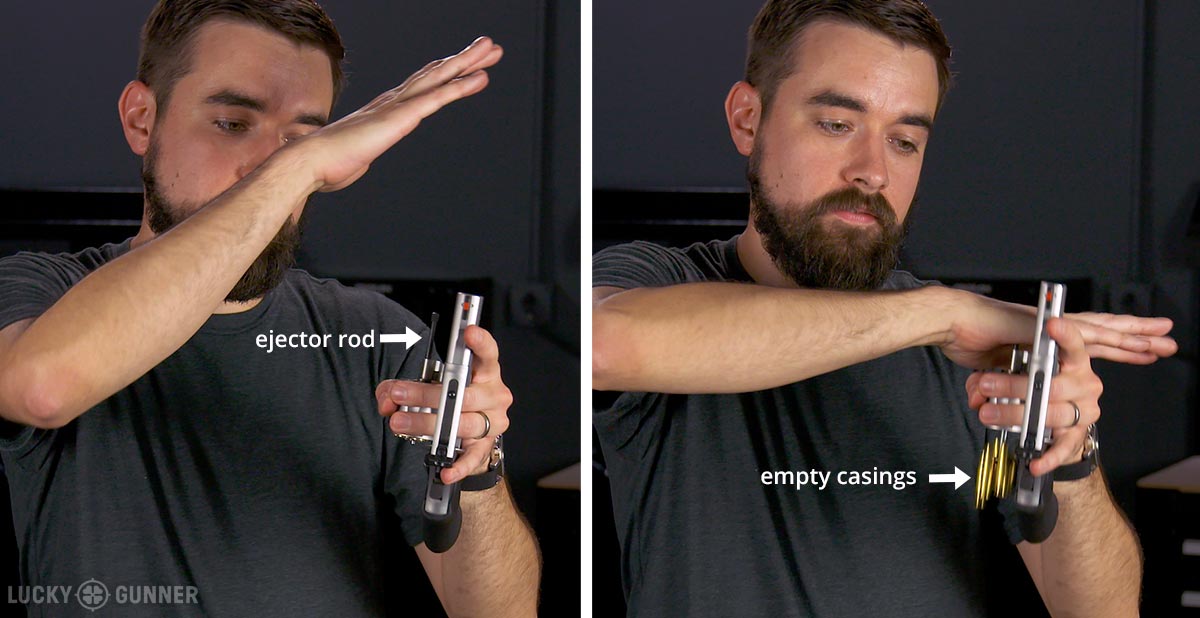
After you have fired the revolver, you will need to remove the spent shell casings from the cylinder. This works just like unloading the gun but with one little difference. Open the cylinder, transfer it to your non-dominant hand, and turn it upside down, but don’t try to catch the casings with your other hand. They’re going to be hot if you have just fired the gun, so simply let them fall to the ground. Some of the casings might fall out on their own, but probably not all of them. So use the palm of your dominant hand and strike the ejector rod once. Don’t be timid, but you don’t have to hit it with a lot of force, either. The ejector rod will force the remaining casings to fall to the ground.
Now the cylinder is empty and you can point the muzzle back at the ground and load it up again if you want to keep shooting. If you’re at a shooting range and you’re done shooting for the time being, but you’re not ready to put the gun away yet, leave the cylinder open, and put the gun on the table with the barrel pointed down range. If you’d like to learn some techniques for rapidly reloading the revolver using a speed loader, check out our posts on reloading techniques and different types of speed loaders.
Cocking and De-cocking
If your revolver has an exposed hammer, you have the option of manually cocking the hammer first before you fire. This is called single action shooting and it makes the movement of the trigger short and light and easy to shoot compared to the longer and heavier double action trigger (the default mode of firing if you do not first cock the hammer). I think it’s fine if you want to shoot the gun single action at the shooting range for fun, but if you are practicing for self-defense, I recommend you work on getting good at the double action trigger instead. When the hammer is cocked, it’s just too easy to make the gun go off when you didn’t mean for it to, especially if you’re already nervous or scared and even more so if you’re an inexperienced shooter.
In the event you find yourself holding a cocked revolver that you do not want to fire, you will need to manually decock it. Hold the grip with your dominant hand and place your index finger (or another finger) from your non-dominant hand between the hammer and the frame. This finger will serve as a “hammer block” and will prevent the gun from discharging if the hammer slips while you’re decocking it. Next, pull back on the hammer with your thumb and press the trigger to release the hammer. Move your finger away from the trigger and ease the hammer forward a little until it’s resting against the index finger you’re using to block the hammer. Then slowly roll your finger up and out of the way as you lower the hammer until it comes to rest on the frame.
If you want to learn more about using a revolver, be sure to check out our other revolver articles. And when you decide to take your revolver out to the range, keep in mind you can get your ammo from Lucky Gunner and have it shipped right to your front door.