

A bunch of people are buying their very first gun right now, so we thought it would be a good time to revisit our Shooting 101 series. This time, we’re doing pump-action shotguns. Like most of our “how-to” type videos, a lot of the demonstrations don’t really translate well to text. As always, we’ve provided the full transcript below, but a lot of it won’t make much sense unless you watch the video.
This one ended up being pretty long, so we cooked up some handy timecode references for easy navigation:
0:02 – Introduction
1:46 – Safe Gun Handling
4:33 – Demo Guns and Nomenclature
6:20 – Shotgun Ammunition Overview
8:13 – Clearing and Unloading
12:52 – Loading
16:37 – Shooting Technique Intro
17:25 – Stance, Mount, and Cheek Weld
20:31 – Using the Safety
22:48 – The Push-Pull Technique
24:14 – Cycling the Action
25:57 – Aiming and Shotgun Sights
28:22 – Using the Shockwave and Other Stockless Shotguns
31:13 – Wrap Up
Hey guys, I am Chris Baker from LuckyGunner.com. I recently posted a couple of in-depth videos all about buckshot. I was planning to move on to other topics not shotgun related, but recent events have led to a lot of people becoming first-time gun owners. So, I thought this would be a good time to revisit our Shooting 101 series. This was a series I did a couple of years ago where I covered the absolute basics of how to use different types of firearms. I covered revolvers, semi-automatic pistols, and AR-15s. Today I’m going to talk about how to use a pump-action shotgun.
I have done many videos about shotguns, and a lot of what I’m about to cover is going to be familiar territory if you’ve been following us for a while. I wanted to put that stuff all in one place specifically for the brand-new, first-time shotgun owner. If you or someone you know just got your first shotgun and feel like you don’t know what you are doing, this video is for you.
I can’t teach you how to be an expert shotgunner in just a few minutes, and I don’t want anyone to think that a video can take the place of real, in-person training from a qualified instructor. However, this should get you going in the right direction so you at least know how the gun works and how to handle it safely.
This is probably going to end up being the longest video I’ve ever posted. There is a lot of ground to cover here and I don’t want to split it up into multiple videos. Depending on what platform you’re watching this on, I’ll try to provide timecode shortcuts to the various parts of the video. We’re going to start off with some safety guidelines, then a quick overview of shotgun ammo, loading and unloading the shotgun, and finally firing the shotgun, which will be mostly focused on recoil management and efficiently running the action.
Safe Gun Handling
Before we get into the shotgun specifics, we need to start out with a couple of basic guidelines for safety. And safe is a relative term. Anything we do with firearms is inherently dangerous. Every time you pick up a gun, you are making life and death decisions. Fortunately, we can mitigate a lot of that risk by following the four basic rules of safe gun handling. There are different ways to phrase these rules, but here’s my summary:
Rule 1: Treat all guns the same way you would treat a loaded gun. You cannot ignore the other three rules just because you believe a gun is unloaded.
Rule 2: Always keep the gun pointed in a safe direction. That means, if it were to fire, it’s not going to hurt anyone and it’s not going to damage anything you can’t afford to replace.
At the range, that generally means pointing the gun either at the target or at the ground in front of the firing line. At home, you should only handle the gun in a designated area where you’ve got a safe backstop.
Rule 3: Keep your finger away from the trigger until you are ready to shoot something. Pretty straightforward, but that’s the one people seem to have the most trouble remembering.
Anytime we’re gripping the shotgun but we are not actively aiming at a target and preparing to fire, we will have our trigger finger straight and glued to the side of the receiver. We don’t just want our finger off the trigger, we want it as far away from the trigger as we can reasonably get it. If you’re left handed and you’re running a sidesaddle on the gun, you’ll have to adjust that technique. Just get the finger up as high as you can. Some lefties will wrap their finger around the bottom of the trigger guard. You might want to consider using one of the shorter 4-shell sidesaddles so you can get your finger up here.
Rule 4: Know what you are shooting at and what is behind it and around it. That goes for the shooting range or anywhere else you might need to use your gun.
This is especially important with shotguns because we are not usually firing a single projectile that travels in a straight line. We’re firing many pellets that gradually spread out the farther away they travel. We are morally and legally accountable for every pellet that leaves the shotgun. Never fire the shotgun unless we are sure of where those pellets are going to end up. That means we have to aim the shotgun and a home defense gun should have some kind of bright light on it so we can be sure of our target when it’s dark.
There’s a lot more to using a gun safely than just these four rules, but if you follow them, you greatly reduce your chance of unintentionally hurting yourself or someone else.
How to Use a Pump Action Shotgun
There are multiple ways to do just about everything I’m about to show you. These aren’t necessarily the correct or only methods for handling and operating a pump-action shotgun, and the way you use the gun is going to change depending on the context. I’m approaching this from the perspective of self-defense. Some of what I’m going to show you will still be relevant if you’re using the shotgun for shooting clays or hunting birds, but some of it won’t.
My demo shotgun here is a Remington 870. It’s probably the most common pump-action shotgun on the market followed closely by the Mossberg 500 and 590 series. Some of the basic controls and techniques are a little different on the Mossbergs, so I will demo those with this gun here. This is a Mossberg Shockwave, it’s basically a 590 with a birdshead grip in place of the shoulder stock.
I don’t recommend the stockless style shotguns like the Shockwave or the Remington Tac-14, especially for beginners, but they are really popular. So in addition to showing you the Mossberg controls, this will give me the chance to demo a couple of shooting techniques that are unique to the stockless shotguns. I’ll be covering that at the very end of the video.
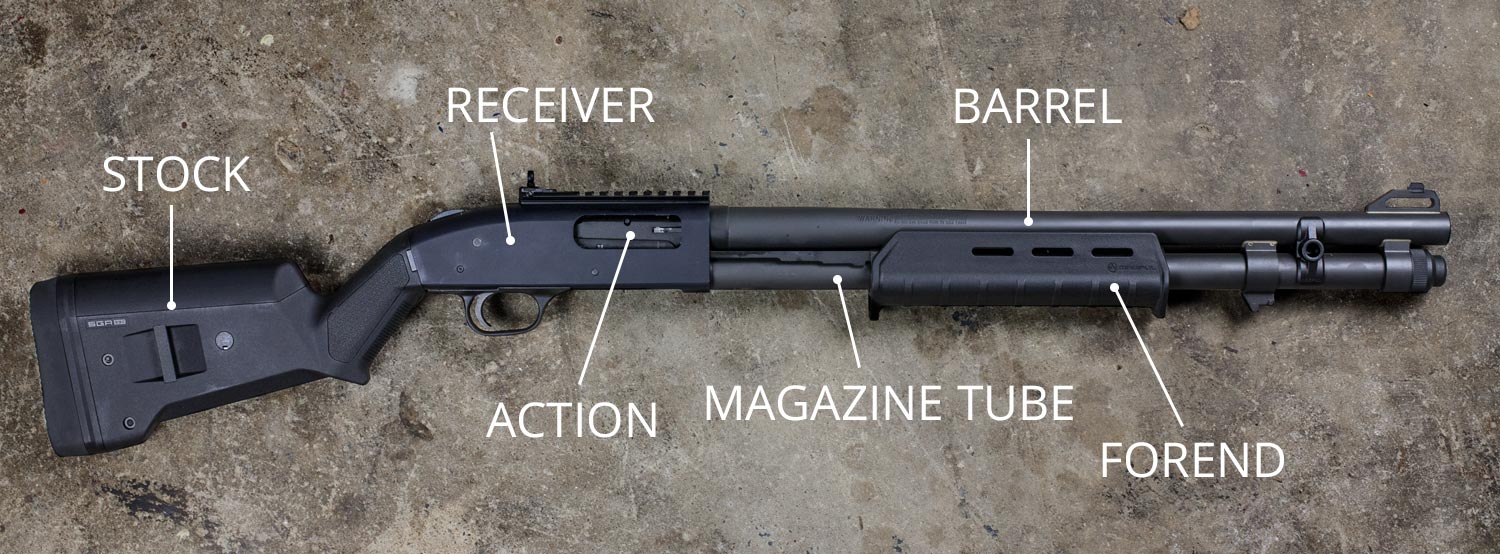
If you’re new to all of this, I don’t think you need to get too bogged down with trying to remember what every little part on the shotgun is called. But you do need to know a few of the major ones just so you know what I’m talking about when I refer to them. This is the stock, also called the buttstock or shoulder stock. This is the barrel and beneath it is the magazine tube or mag tube. This part that moves back and forth is the forend. The big part in the middle that everything is attached to is the receiver. And all of the moving parts inside the gun together are referred to as the action.
Ammunition Overview
Shotguns are one of the most versatile firearms we have because they can fire several different types of ammunition. We could spend all day talking about shotgun ammo alone. Like I said, I recently did a couple of videos just about buckshot. But for now, you don’t need to know everything there is to know about shotgun shells. What you do need to know is that there are three basic types of shells and the effect they have on the target is very different. There’s birdshot, buckshot, and slugs.

A round of birdshot is loaded with anywhere from a few dozen to a few hundred tiny lead or steel pellets. The largest birdshot pellets are just under a quarter inch in diameter. The smallest are not much bigger than a grain of salt. Birdshot is used for shooting birds and other small moving targets at a range of about 40 yards or less.
Buckshot is similar to birdshot except the pellets are larger and there are fewer of them. Most buckshot pellets are between about a quarter and a third of an inch in diameter. Depending on the size of the pellets, you’ll usually get anywhere from 8 to 30 pellets in a shell. Buckshot is used for taking medium sized game, and for centuries, has also been the shotgun load of choice against human targets. The useful range of buckshot varies, but beyond about 40 or 50 yards, it becomes very difficult to reliably hit a target with buckshot.
A shotgun slug consists of a single large lead projectile. It basically turns the shotgun into a very powerful rifle, although with shorter range and less accuracy than most rifles. Slugs give the shotgun more penetrating potential and increase the effective range of the shotgun to roughly 100 to 200 yards.
If your primary interest is self-defense, you will probably want to keep your shotgun loaded with buckshot. When you’re practicing at the range, you can use mostly birdshot because it’s a lot more affordable, but you should also occasionally practice with your buckshot as well.
Basic Operation
Clearing and Unloading the Shotgun
Anytime we handle the shotgun, the first thing we need to do is clear it. That means we’re going to check and see if it’s loaded and if it is, we’re going to unload it.
Activate the Safety
The first step is to make sure the safety is on. For the Remingtons, the safety is this button right behind the trigger. Press it in from the left side so that you can’t see the red ring.
The Mossberg safety is on the back of the receiver just forward of the stock. Make sure it’s in the rearward position so you can’t see the little red dot. The safety will block the trigger so it can’t be pulled, but we never want to rely on that completely. We still have to follow all of the safe handling guidelines we just talked about.
Check the Magazine Tube
Okay, now we can check the magazine tube for ammunition. The easiest way to do that is to flip the gun upside down and visually inspect the opening in the tube. On the Remington, this little flappy thing here might be in the way. That’s the shell lifter, sometimes called the elevator or carrier. Just hold it down so you can get a good look into the mag tube.
On the Mossbergs, the lifter won’t be in the way so you will have an unobstructed view of the mag tube. On either gun, you should see the follower – it might be silver, or black, or red, or some neon color depending on the specific model you have. If you’re not in good lighting, it might be hard to tell if you’re looking at the follower or at the base of a shotgun shell, so don’t get in a hurry when you’re doing this.
Check the Chamber and Lifter
If you don’t see any shell in the mag tube, your next step is to make sure there’s no shell in the chamber. Flip the gun back right side up, and vigorously run the forend to the rear. If the forend is locked in place and won’t open, you’ll need to hold down the action release. On the Remingtons, that’s on the left side of the gun right here in front of the trigger guard. On the Mossbergs, it’s behind the trigger guard. Just press and hold that and you should be able to open the action.
At this point, if there was a shell in the chamber, it should have ejected when you opened the action. That would look like this. Just in case, you’ll need to visually inspect the chamber to make sure there’s nothing in there. Also take a look at the shell lifter. That’s the part that lifts the shell from the mag tube to the chamber. If there was a shell (or multiple shells) in the mag tube and you missed it when you checked, that first shell will now be on the lifter. Usually, you can just tilt the muzzle down slightly, rotate the gun 90 degrees, and the shell will drop out of the ejection port. Now we’re going to check the mag tube again because apparently we missed the shell that was there the first time. Okay, now I’m satisfied that the gun is unloaded.
Unloading the Magazine Tube
If there were shells in the mag tube when you checked it and you want to unload them, there are a couple of ways to do that. The quickest way is to just hold down the action release and run the action back and forth until shells stop coming out. But that’s not really the safest way to do it, especially when you are anywhere other than a shooting range with a safe backstop in front of you. That’s basically loading and unloading the gun multiple times which presents a lot of opportunities to make some pretty big mistakes. There’s a safer way to do it.
This method is easiest with the Mossbergs. Make sure the action is closed. Then flip the gun upside down and look just to the right of the shell in the mag tube. There’s a tab that’s holding the shell in the tube. That’s the shell stop. Press that inward with your thumb, and the shell will pop out. Then slowly ease the shell out of the tube. Repeat that process until you see the follower.
On the Remingtons, the process is similar, but if you try to go straight to the mag tube, the shell lifter is in the way. You can hold it down and get the shells out, but there’s an easier way. What I suggest is, open the action first. Now you will have a shell on the lifter. Tilt the muzzle downward and rotate the gun 90 degrees and that shell will fall out.
Leave the action open and flip the gun over again. Now if you push on the lifter, it will pop all the way down out of your way. The Remington has shell stops on both sides of the mag tube. If the action is open, the stop on the left should be the only one that’s holding the shell in the tube. Push that out of the way and the shell will pop out of the tube and you can slowly guide it out with your finger. Repeat that until you see the follower.
Okay, so the mag tube is empty. Action is open. Nothing in the chamber, nothing on the lifter. Safety is on. The gun is clear. Now we can clean it, we can do some dry practice, we can put it away for storage or whatever else we need to do with it. In this case, we are going to load it.
Loading the Shotgun
There are different procedures for loading the gun. I’m not going to be doing emergency or speed reloading. I’ve covered some of those techniques in other videos. This is just everyday administrative loading without any time pressure. I’m going to demo this with these dummy shells I’ve been using. These are available in several places online. I recommend you get a set of these so you can practice loading and unloading the gun safely at home.
First, open the action and tuck the stock under your arm for support. Take the first shell in your other hand and just pop it into the action like that. Now, close the action. Your chamber is now loaded. At this point, if you were to push the safety off and pull the trigger, the gun would fire. But we’re not ready to do that yet. We have to load the mag tube.
Grab your next shell, push it up into the action and pin it there with your index finger. Use your thumb to push the shell into the mag tube. Make sure the shell goes in all the way past the shell stops. If you don’t, the shell will pop right back out. Your thumb will need to actually go into the mag tube a little bit like that.
On the Mossbergs, again, the lifter won’t be in your way, so this will be pretty easy. On the Remingtons, just use the knuckle of your thumb to push against the lifter and keep it out of the way. Keep your thumb bent like this. If you don’t, the lifter is a lot more likely to pinch the tip of your thumb and that gets really old after loading a couple of boxes of shells. Repeat that process until no more shells will fit in the mag tube.
Now the gun is fully loaded. The forend is locked in place. When we’re ready to fire, we disengage the safety. Press the trigger. The gun goes bang. After the trigger has been pressed, the forend unlocks. Before we can fire again, we have to open the action. That ejects the spent shell from the chamber. The next round is now sitting on the shell lifter. Push the action closed and now that round is in the chamber and the gun is ready to be fired again.
You can keep firing until you’re out of ammunition, or you can reload the mag tube before the gun is empty. As long as there is room in the mag tube, you can fill the gun back up.
Cruiser-Ready Condition
Let’s say you want to have the gun loaded and ready to use but you don’t want to actually have a round in the chamber. A loaded chamber is a good way to carry a handgun that’s going to be on your person in your immediate control with a holster that totally covers the trigger guard. With a shotgun that’s in your safe or your closet, a loaded chamber presents some additional risks. You might reach for your gun in a hurry in the dark and accidentally grab the trigger. Your cat might start pawing at the gun under your bed. The gun might fall over and discharge in your closet because unlike most handguns, shotguns are not totally drop safe. To mitigate those risks, you can store the shotgun in what’s called the cruiser-ready condition. That’s with a full magazine tube and an empty chamber.
Start by clearing the gun just like before: nothing in the mag tube. Nothing in the chamber, nothing on the lifter. Then, after you have triple checked that there’s nothing in the chamber, close the action, point the gun in a safe direction, disengage the safety, and press the trigger. That will unlock the action. Now, you just load up the magazine tube and it’s ready for storage. If you need the gun in an emergency, all you have to do is grab it and rack the action to chamber a round. You don’t have to mess with the action release, because the action is already unlocked.
Shooting Technique
Let’s talk about shooting technique. This is really important with shotguns because they are so powerful. When you fire the gun, the pressure generated inside the shell that pushes that heavy load of pellets out of the barrel at high speed is also pushing the shotgun against you. That’s what we call recoil. If you don’t learn to manage recoil effectively, at best, you’ll be shooting very slowly, and at worst, you’ll end up with a black and blue shoulder and you’ll develop a bad flinch and never hit what you’re aiming at.
It doesn’t matter how big you are, if you don’t have good technique, this gun will push you around. But with the right technique, even smaller statured people can manage a shotgun well. I’m a smaller than average male and I do okay with a shotgun. Here’s my friend Annette. She’s only about 5’4” and she knows her way around a 12 gauge. It’s all about having the right technique.
Stance
Good recoil control starts with a solid stance. Stand with your feet at least shoulder-width apart, maybe a little more. Your dominant side foot should be slightly back. Lean forward at the waist. You want an aggressive forward posture with your weight resting on the balls of your feet. Now we’re going to mount the gun.
Mount
You might be tempted to place the stock on your shoulder or just inside your shoulder at the joint and blade your body toward the target. I don’t recommend that. Instead, bring the stock inward. Get it on the outside of your pectoral muscle, or even further toward your centerline if you can. You want the stock off your shoulder and off of where your collar bone sticks out. Keep your shoulders closer to being squared with the target, not bladed. This is going to allow you to absorb that recoil with your whole upper body so it’s not all going into just one bone or joint.
Keep your elbows pointed down, not sticking out to the side like this. Place your thumb along the side of the stock, not wrapped around the back. That way, if you do get a less than perfect mount or you have to fire from an awkward position, you don’t run the risk of popping yourself in the nose with your thumb.
Mount the gun up high enough so that when you aim, you don’t have to bring your head down to the gun, the gun is going up to your head. If you have to scrunch your neck down a little that’s not a big deal, but you want to make sure you’re not craning your head over to one side in order to aim down the barrel.
Cheek Weld
Bring the gun up to your eye-line and rest your cheek against the stock. We call that a cheek weld. You want the same points of contact with the stock every time. If you have a consistent mount and a consistent cheek weld, aiming the gun will be a piece of cake. It will just automatically point at whatever you’re looking at, and you only have to use the sights to fine tune your aim.
With a good shoulder mount, go ahead and pivot the muzzle down about 45 degrees. This is the low ready position. It’s kind of the default position when you’re ready to shoot but you’re not actually aiming at a target.
When you’re ready to fire, simply pivot the gun up to eye level and the index finger can move from its resting place on the receiver to the trigger.

Get a Shorter Stock
The problem you’re probably going to run into at this point is that your stock is too long. I hate to tell people that they have to go out and buy even more stuff before they start practicing with their new gun, but in this case, it really makes a huge difference. The standard stock that comes with most shotguns is so long that if you bring the gun inboard, off your shoulder, you will probably have trouble reaching the forend. It’s really hard to square up to the target and get your whole upper body behind a gun with a stock that’s too long.
If you’re more than six feet tall, this probably won’t be as much of a problem, but I know some very tall shotgun enthusiasts who still prefer a shorter stock. If you can, buy a youth stock or a Magpul stock like this one and remove all of the spacers. It will make this technique a lot easier.
Using the Safety
Now, what about the safety? When should it be on, when should I disengage it? Well, if this was an AR-15 or a handgun with a well-designed thumb safety, I would say that the safety should be on anytime you’re not actually aimed at the target. Gun up, safety off. Gun down, safety on. Unfortunately, some of our shotguns make that difficult.
On the Remingtons, the safety is here behind the trigger guard. If we have our finger up on the receiver where it should be, when it’s time to fire, we’ve got to go all the way back here, push the safety in, and then go to the trigger. That is surprisingly difficult to do if you’re under a lot of pressure. If you’re left handed, it’s not any easier. You’ll have to use your middle finger to reach around and hit the safety.
Some people keep their finger on the safety ready to disengage it. That’s faster, but I’m not really comfortable with that. I don’t want to get into the habit of having my finger that close to the trigger when I’m not ready to shoot. I’ve got an oversized aftermarket safety on this gun so I can hit the safety with the inside of my knuckle. Still not really ideal in my opinion.
With the Mossbergs, this isn’t as much of a problem. You can run the safety with your thumb and keep your finger away from the trigger. It works just as well for lefties. But if you’ve got a stock with a pistol grip, it’s a different story. You won’t be able to reach the safety at all unless you completely break your firing grip on the gun.
So, if you find that the safety is difficult to use or that using it compromises safe trigger finger placement, I think it’s okay to just leave the safety off when the gun is in your hands and you’re in a ready position. I only say this very reluctantly. It’s probably not a great idea for some people. It’s an imperfect solution to deal with a sub-optimal safety design.
This is another reason I like to store the gun in a cruiser ready condition. If I’ve got the chamber empty, it’s not a problem that the safety is off. I can grab the gun, rack in a round, and I’m at a ready position with the safety already off. If I need to put the gun down for some reason, I can flip the safety on at that point.
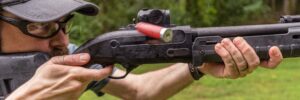
The Push-Pull Technique
Okay, back to shooting the gun. Besides a good stance and mount, the other key to recoil management is the push-pull technique. Just before you press the trigger, push the gun away from you with the support hand and pull it in toward you with the firing hand. It should feel like you’re trying to tear the gun in half.
Make sure the stock remains snug against your body. If you leave any gap between you and the stock, the gun will have room to accelerate into your body and instead of a slight push, the gun is going to hit you and that’s not very comfortable. But either way, if you push out on the forend, you’ll reduce the felt recoil against your body. You don’t need to push-pull all the time, you’ll wear yourself out that way. The moment before you decide to fire, you give it a quick push-pull.
I’m going to fire a couple of rounds without doing a push-pull. Watch the front of my muzzle and see how much it rises. Also pay attention to how far my upper body gets pushed back.

It makes a big difference. If you’re a larger male, you can probably get away without doing a push-pull, but I guarantee you will be able to get back on target quicker with a push-pull. If you’re well under 200 pounds like me, push-pull is almost a necessity for shooting a 12 gauge without getting a sore shoulder.
Cycling the Action
Besides recoil management, cycling the action is the aspect of pump shotguns that’s most likely to trip up beginners. When you press the trigger, the gun goes bang, then you can cycle the action and fire again.
Vigorously pull the forend back as far as it can go and then vigorously push it back forward again. “Vigorously,” because that’s the best way to avoid a malfunction. If we don’t open and close the action completely and don’t use enough force, we might end up with a spent shell stuck in the action or an empty chamber or a number of other malfunctions. So rack the gun like you mean it.
And rack it immediately after the gun fires. Gun goes bang, back all the way, then as soon as the forend stops, push it forward all the way. As the instructor Tom Givens says, it should be “BOOM-chunk-chunk.” The “chunk chunk” is not something that happens before the next boom, it’s part of the follow-through from this boom.
What this looks like for most people who are untrained and inexperienced is “BOOM… chunk… chunk.” They don’t have good recoil management. The muzzle lifts way off target and they need a second to recover after the “BOOM” before they can even think about the “chunk-chunk.”
But that won’t happen when you do it because you’ve got a solid mount and a good push-pull. The gun’s just going to move slightly and while it’s recoiling, you’re going to use that opportunity to run the action: “BOOM-chunk-chunk.” After you’ve cycled the action, go right back into a push-pull and get ready to fire another shot if you need to.
Aiming and Shotgun Sights
Like I said at the beginning, we are accountable for every pellet that comes out of the gun, so we absolutely do need to aim the shotgun. Inside of 50 feet or so, the pellets haven’t had enough time to spread into a big cloud of shot like we would fire at a bird or clay target. If you fire a round of buckshot across your living room, the spread of the pellets is probably going to be smaller than a basketball.
It is very easy to miss completely if you don’t aim the shotgun. Even if you don’t miss completely, I wouldn’t consider it acceptable to miss at all. If you fire a shell with nine pellets of buckshot and hit your target with five of them, where do those other four pellets go? Could they hit your spouse? Your dog? Could they go out the window and into your neighbor’s house? You’re accountable for that. Aim your shotgun.
Aiming the gun is easier if we have a good stance, mount, and cheek weld. But we still want a reliable sighting system. Under the pressure of a life and death emergency in the middle of the night, we need all the help we can get. There are generally four types of sights for shotguns. The simple bead sight, rifle style sights, ghost ring sights, and electronic red dot optics. The latter three are pretty straight forward, I won’t go into a lot of detail with those.
With a red dot, you just put the dot where you want the pellets to go. Extremely easy to use and they work in all lighting conditions. With the rifle and ghost ring sights, line up the front post with the center of the rear notch or aperture and then put the front post on the target. If you get sights with the tritium glow in the dark inserts, they’re also pretty good in low light, but not as quick or easy to use as the red dot.
Bead sights are a little more tricky. To line up a bead, the top of the receiver becomes the rear sight. So when you look down the barrel, the top of the bead should be just below the target and you want to see that bead centered on the receiver with the bottom of the bead touching the top of the receiver. The mistake people most often make is to aim too high and their shot goes right over the target. When you’re aiming with the bead, you shouldn’t see any of the barrel. If your bead has a base or a pedestal, you shouldn’t see any of that, either.

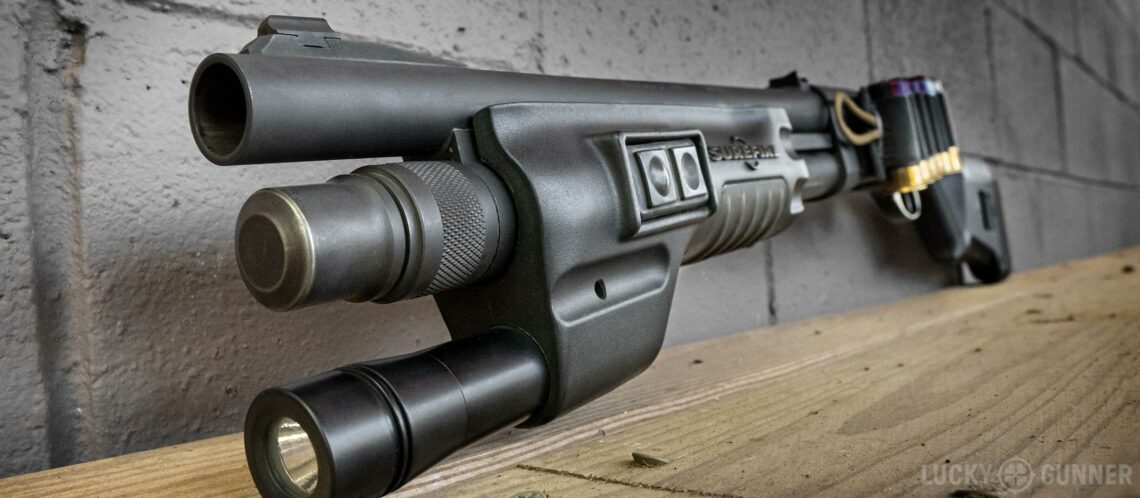
When you get the hang of it, a bead sight is very quick and simple but of all the options, it is the most difficult to see in low light. There are some aftermarket sights available that can go over a bead sight to make it bigger and easier to see. Some of them also have a tritium insert like this one from XS sights. I think this can be a huge improvement to a home-defense shotgun without spending a lot of money.
Firing the Shockwave and other Stockless Shotguns
The last thing I want to cover is firing one of these: a shotgun with a birdshead grip. I did a video a while back where I called the Shockwave mostly useless. A lot of people took that literally and got a little upset. Obviously, they’re not useless, that was hyperbole. But a lot of these guns are being sold to inexperienced shooters and I don’t think that’s wise. These are like the .38 Special snub nose revolver of shotguns. They’re appealing because they are small, light, powerful, and relatively simple to operate. But they are much more challenging to shoot proficiently than their full size counterparts.
That pesky little issue of shot accountability really comes into play when you’re shooting without a shoulder stock. Without much trouble, you may be able to fire this gun from the hip and hit a tin can at 20 yards because you’ve got a three-foot wide cloud of birdshot. But that does not mean it’s equally easy to hit a human target across the room with a load of buckshot and not expect to have at least some of those pellets fly off into the great unknown.
So, we’re not going to fire this gun from the hip, even if the owner’s manual says to. We are going to hold the gun up at eye level and aim it. You can get a laser sight for these and that does make hip firing a more viable option. I still don’t think that’s ideal because if the laser dies, you’re back to guessing where the pellets are going.
So, I suggest you hold the gun up just beneath your dominant eye and then push it out a little away from your face. From here, you can see your sights and aim properly. Keep your thumb straight along the receiver and when the gun recoils, even if you have poor recoil control, the grip will come back beside your cheek, you won’t smack yourself in the face. But if you’ve got a really good push pull going just like I talked about with the stocked shotgun, that won’t be a problem anyway.

When you cycle the action, you don’t have a stock braced against your body to counteract that rearward motion. If you have a brand new gun, the action is going to be kinda stiff. Racking it without a stock might be awkward. Instead of bringing the forend back and forth, you might consider keeping the forend in one place and moving the gun with your strong hand. Or maybe a kind of hybrid technique where you bring the two hands toward each other.
With some practice, you can get pretty good at running the action and recoil management. It’s really aiming the gun responsibly that becomes the most difficult part of this. With the stocked shotgun, your mount and your cheek weld are doing half of the job of aiming for you. When you take away the stock, you lose that advantage. So you really have to pay attention to what your bead or sights are telling you about where those pellets are going.
That’s It!
If you found that at all helpful, you might want to check out our other shotgun videos. We have a playlist of those on YouTube, or you can find them on our blog at Lucky Gunner Lounge. Just click on “shotguns” under the series tab on the menu at the top of the page. You’ll also find full transcripts of all of our shotgun videos there and some additional shotgun articles.
Guys, I know the ammo market is crazy right now with all that’s going on. We are doing our very best to get more in stock, but it’s flying off the shelves just as fast as it comes in. Hopefully, things will calm down soon and then you will be able to get any of the shotgun ammo you might need from us at LuckyGunner.com.